Secure, Scalable Home Web Hosting: with HAProxy, pfSense, Let's Encrypt & Cloudflare


In this article, I'll walk you through a comprehensive setup for self-hosting web applications. This configuration is ideal for both homelabs and small production environments, enabling you to host multiple websites on a single IP address and port. We'll focus on security, flexibility, and centralized management.
Using pfSense as our base operating system, router, and firewall, we'll leverage the ACME protocol for automated SSL certificate management, HAProxy for reverse proxying, and Cloudflare for DNS and CDN services.
I'll explain the role of each component and guide you through every step of the process-including how to avoid some common gotchas. By the end, you'll have a secure, scalable setup for hosting multiple services using domain and subdomain-based routing, with centralized SSL and traffic management.
Let's Encrypt!
It's 2025. I don't care if you're serving a static site of cat pics, it needs to be encrypted. Fortunately, Let's Encrypt is free and easy. We'll be using the ACME protocol to automatically request and renew certificates.
What's HAProxy and why are we complicating things?
HAProxy (High Availability Proxy) is a reverse proxy, also known as a load balancer. A reverse proxy sits between backend server(s) and clients forwarding requests to the appropriate server. There are a lot of reasons one would want to use a reverse proxy but if you're reading this, you're likely a beginner or homelabber. I'll focus on what's important to me (and likely you) which differs from an enterprise environment.
- Content-Based Routing
This is the most crucial feature in my opinion for both the home and enterprise user. Here are a few general use cases enabled by HAProxy:
- Multiple domains single public
IP:Port - Multiple apps on a shared backend server
- Routing based on subdomain
You likely only have one public IP address, and want to use standard ports (80 and 443) for your websites. HAProxy can listen to these ports and route traffic based on the domain name in the HTTP header to the corresponding backend server and port.
While not necessarily a security product, a reverse proxy can improve your security posture by reducing the number of “holes” in your firewall (port forwards) and masking the IP address of backend servers. - Multiple domains single public
- SSL Termination
HAProxy can handle SSL termination, meaning it can decrypt incoming HTTPS requests and forward them to the backend server. Setting up and renewing certs across multiple backend services can be time-consuming, error-prone, and fragile. Separating SSL handling from the backend server reduces complexity, especially when tinkering or supporting multiple backends. I find certificate management for containerized applications (Docker) particularly difficult, this removes that headache.
Performing SSL termination on HAProxy may have performance benefits as well. For example, my PFSense appliance has specialized hardware, Intel QAT, for SSL acceleration, which my backend servers lack. This is unlikely to be of practical concern, unless you're running a high traffic site on a Raspberry Pi 😉.
Finally, SSL termination is required to fully utilize intrusion detection and prevention systems like Suricata as core features like deep packet inspection are not possible on encrypted traffic.
We'll be using SSL termination in the guide below, but advanced topics like Suricata will be left for another day. - Load Balancing
Unsurprisingly, a tool called a load balancer can balance the load across multiple backend servers. HAProxy can also be provisioned to handle failover, health checks, and sticky sessions. This is similar to the content-based routing feature, but instead of routing based on the domain, it routes based on the load or health of the backend server.
Why Cloudflare
I decided to move my domain over to Cloudflare when I started this project. My previous provider was not supported by ACME, didn't have DDNS functionality, and I wanted to take advantage of Cloudflare's features. Cloudflare can be used without transferring, but it seemed worthwhile to consolidate. The transfer was painless, and I highly recommend it as Cloudflare offers a variety of benefits, even in its free tier. Some features that are important to me:
- DNS Services
Cloudflares DNS Service supports ACME, DDNS, and is highly optimized.
- Content Delivery Network (CDN)
Cloudflare caches your content on servers around the globe, reducing the load on your server and improving performance for clients.
- Security
Cloudflare offers protection against Distributed Denial of Service (DDoS) attacks and provides a basic Web Application Firewall (WAF) in the free tier.
If you read the section above, you likely have a good idea of how Cloudflare works; that's right, it's a reverse proxy performing SSL termination. If you don't have any interest in Cloudflare that's fine, most of the guide will still apply.
Getting to work
With the what and why out of the way lets get into the how.
Installing Packages
We'll start by installing the ACME and HAProxy packages on pfSense.
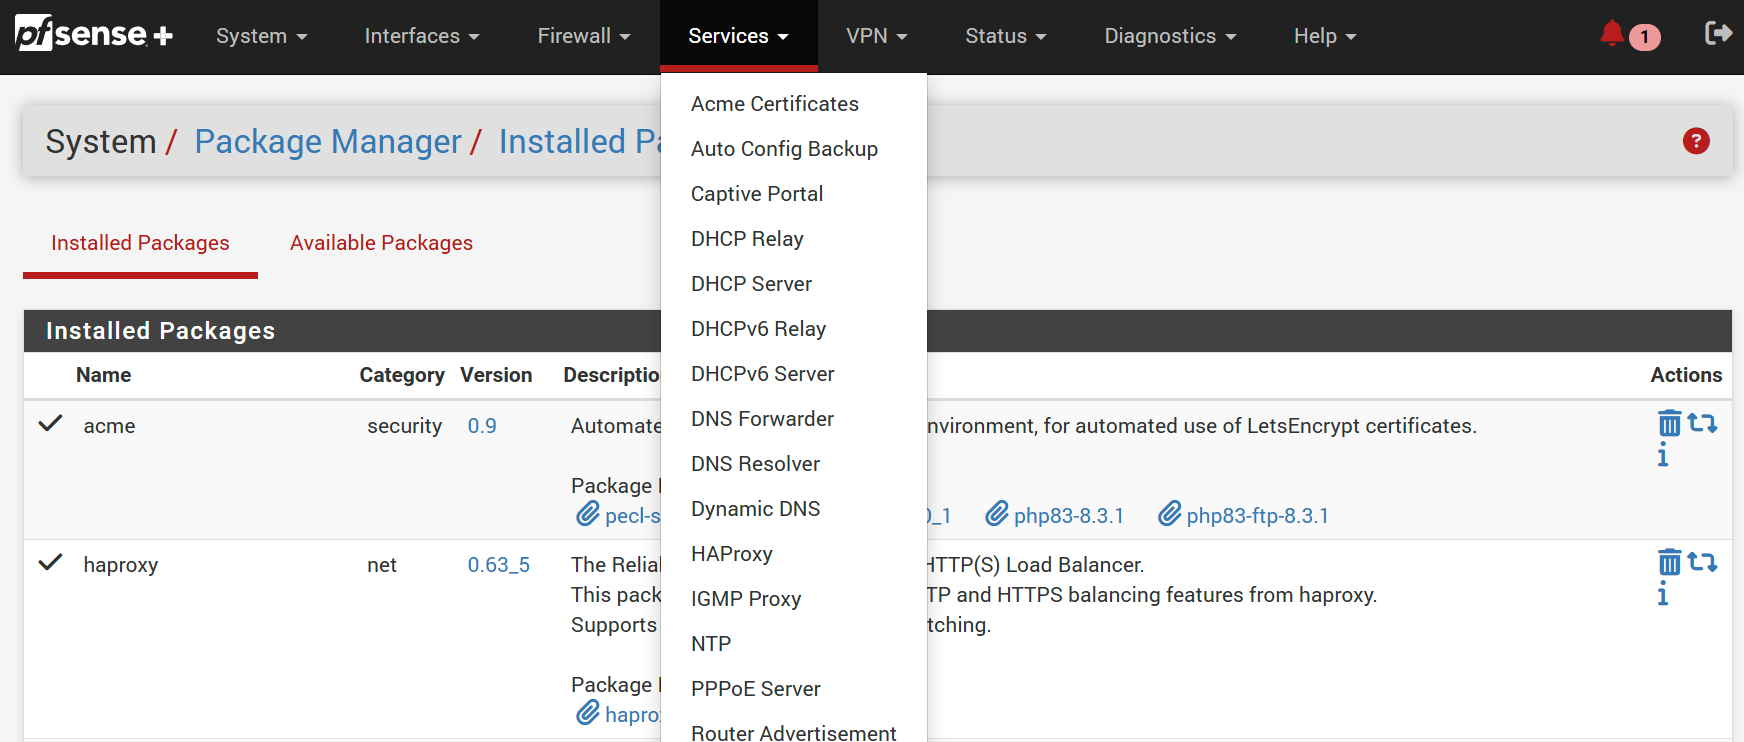
Navigate to System/ Package Manager/ Available Packages, search for ACME and HAProxy, and click install.
When you're done, you'll see them in the installed packages tab and the services menu.
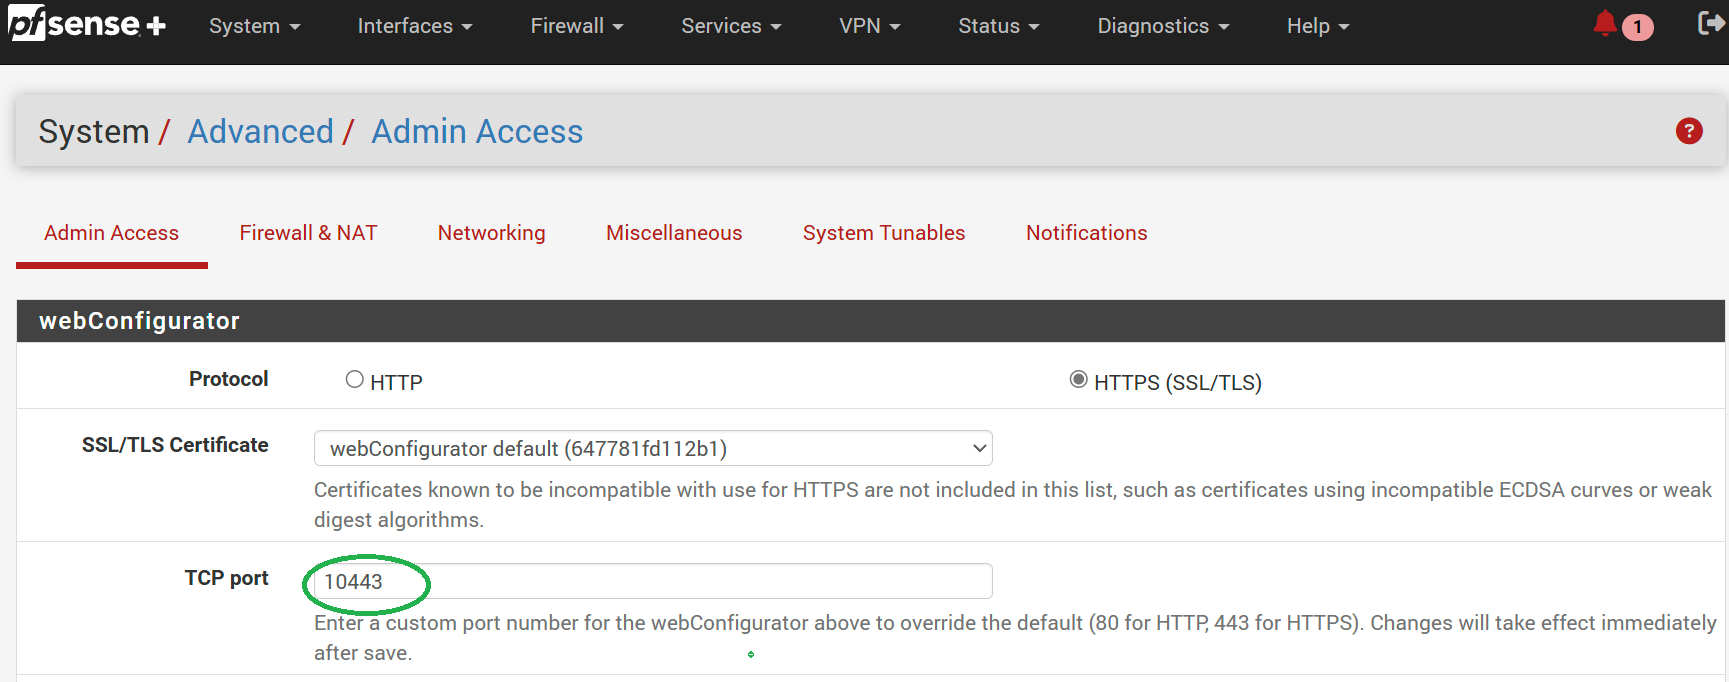
Change Admin Port
Do not skip this step! We'll be using ports 80 and 443 for HAProxy, so we need to change the pfSense admin port.
Failure to do so will result in a conflict locking you out of the web interface.
Go to System/ Advanced/ Admin Access, change TCP port and click save.
I personally use 10443, but you can use any open port.
Note that you'll need to include the new port in the URL when accessing the pfSense web interface ex. https://192.168.1.1:10443
You may have an understanding spouse now, but that's unlikely to last if bring down the internet for a few hours when tinkering a few beers deep.
I recommend you get familiar with the recovery instructions and have the necessary drivers installed before an outage.
Configuring ACME with Cloudflare
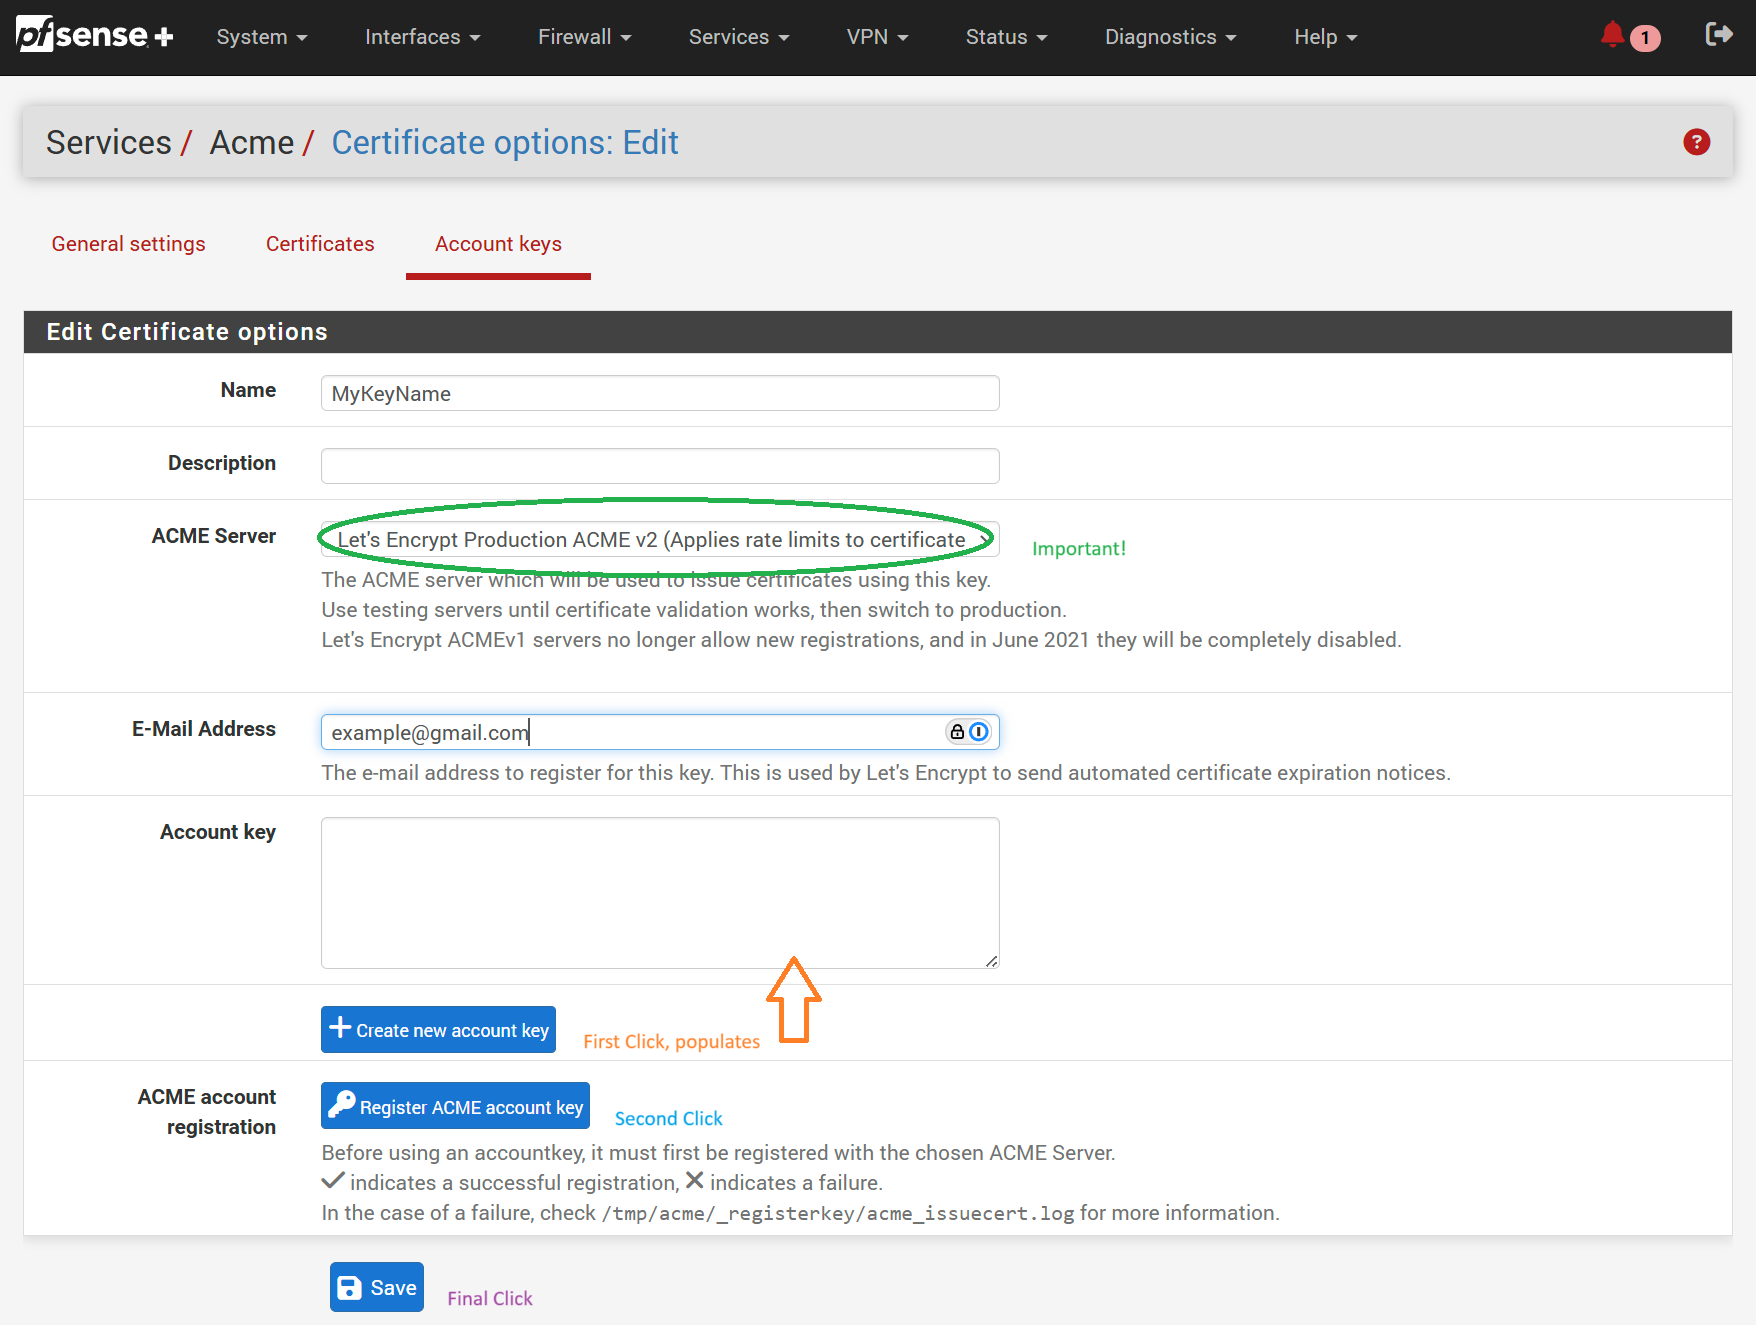
Create an ACME Account
First, we need to create an account key.
Navigate to Services/ ACME/ Account Keys and click Add.
Complete the form being sure to set ACME Server to Let's Encrypt Production ACME v2.
Click Create a new account key then Register ACME key and finally Save.
Ultimately, we want to create a new certificate with ACME using the DNS-Cloudflare method. This requires an API token from Cloudflare along with some other information we'll get in the next section before jumping back into ACME.
DNS Configuration (Cloudflare)
I'm assuming you already have a domain with DNS through Cloudflare. If not, you can buy a new domain from Cloudflare at cost, transfer an existing one, or just change the existing one's DNS servers. Alternatively, you can skip this section and proceed with the guide using a different DNS provider supported by ACME.
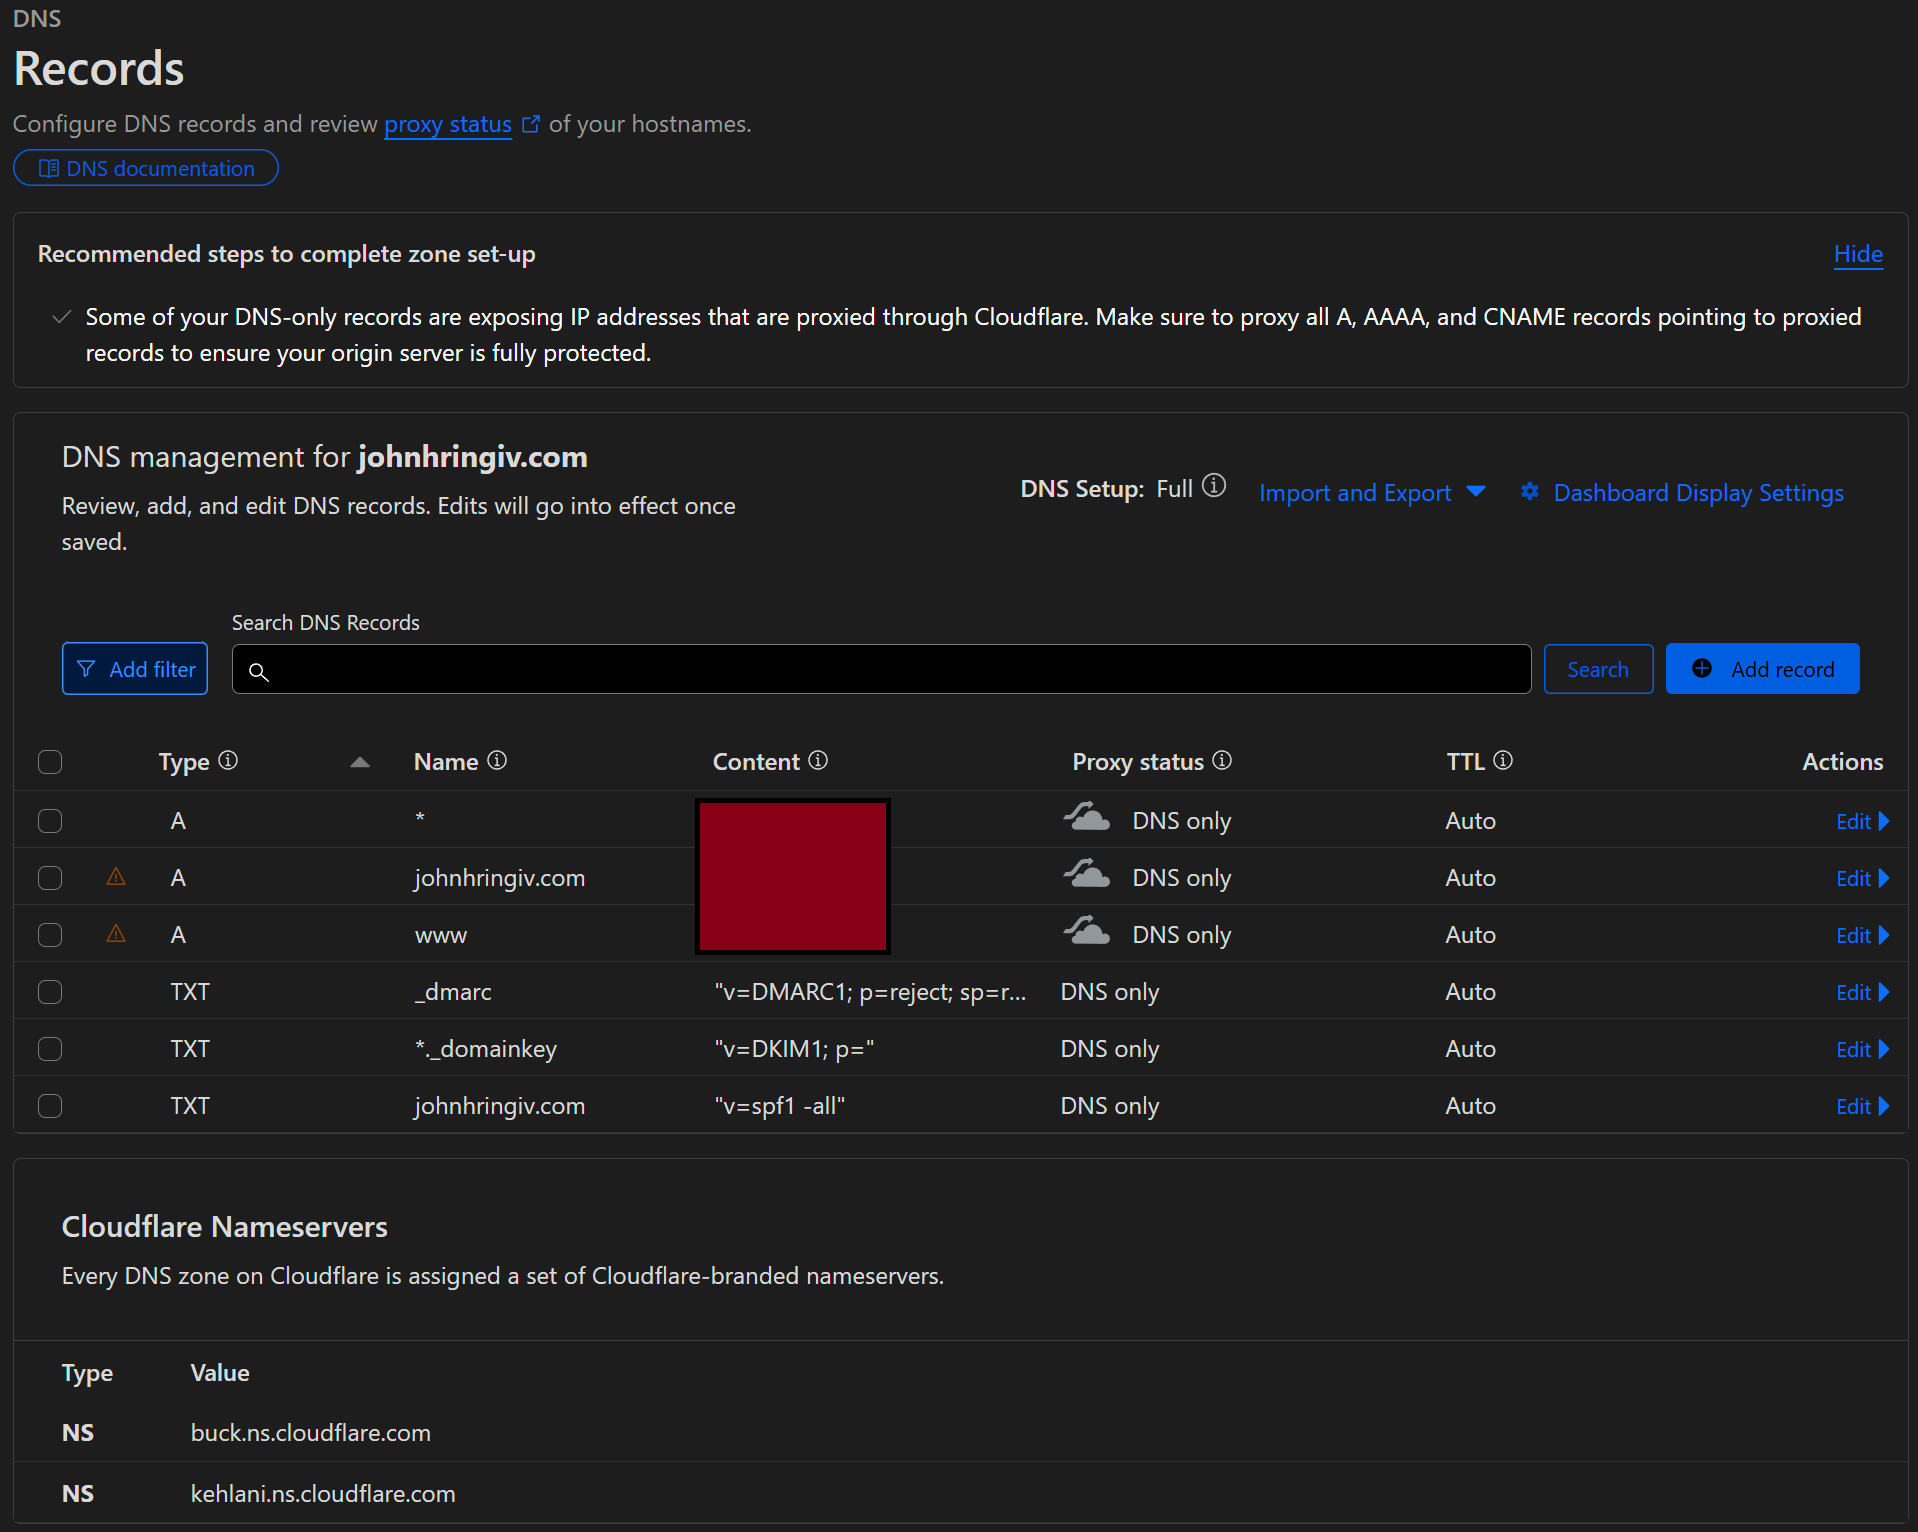
Log into Cloudflare, select your domain, then click DNS on the left. We'll need to add A records @, *, www which Cloudflare will expand to the correct text for your domain. Technically, * covers www, but I like to be explicit to avoid confusion. We'll need to temporarily disable the Proxy status (orange cloud) for these records to allow ACME to validate the domain ownership. If you're not planning to set up email for your domain I recommend clicking the prompt set up restrictive SPF, DKIM, and DMARC records which will prevent email spoofing.
Creating A Cloudflare Token
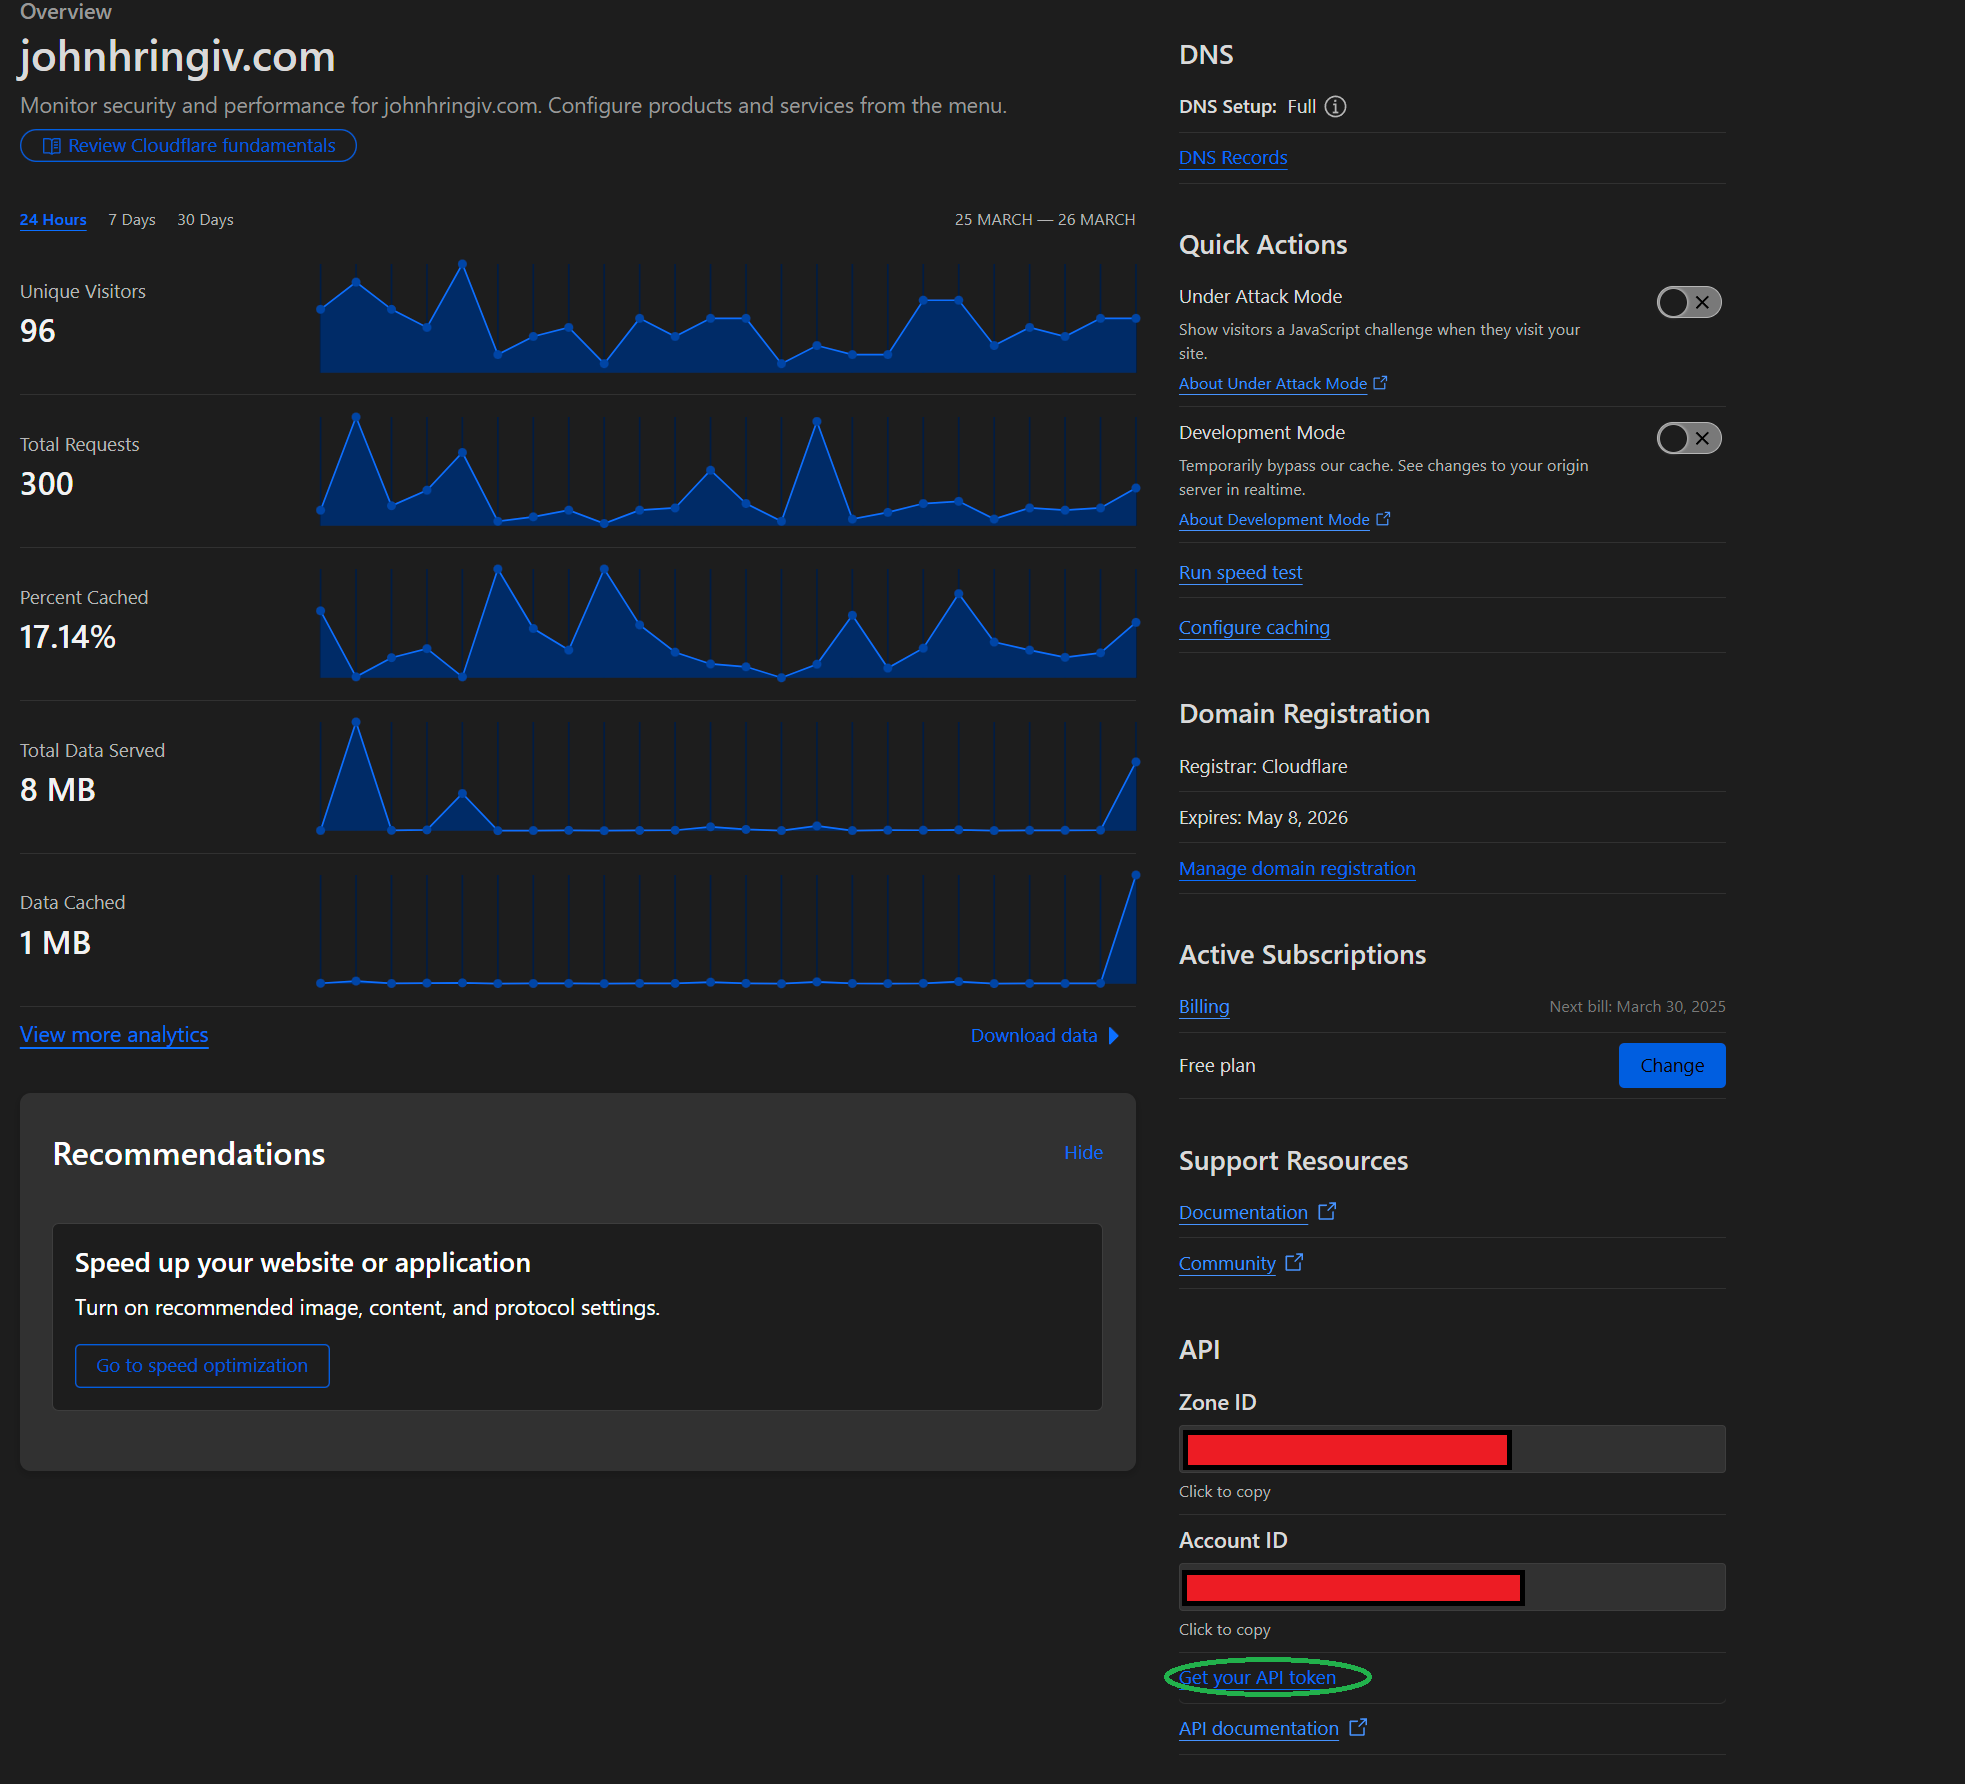
From your domain's overview page, grab the Zone ID and Account ID from the bottom right. Once you've done that, click the Get your API token link right below.
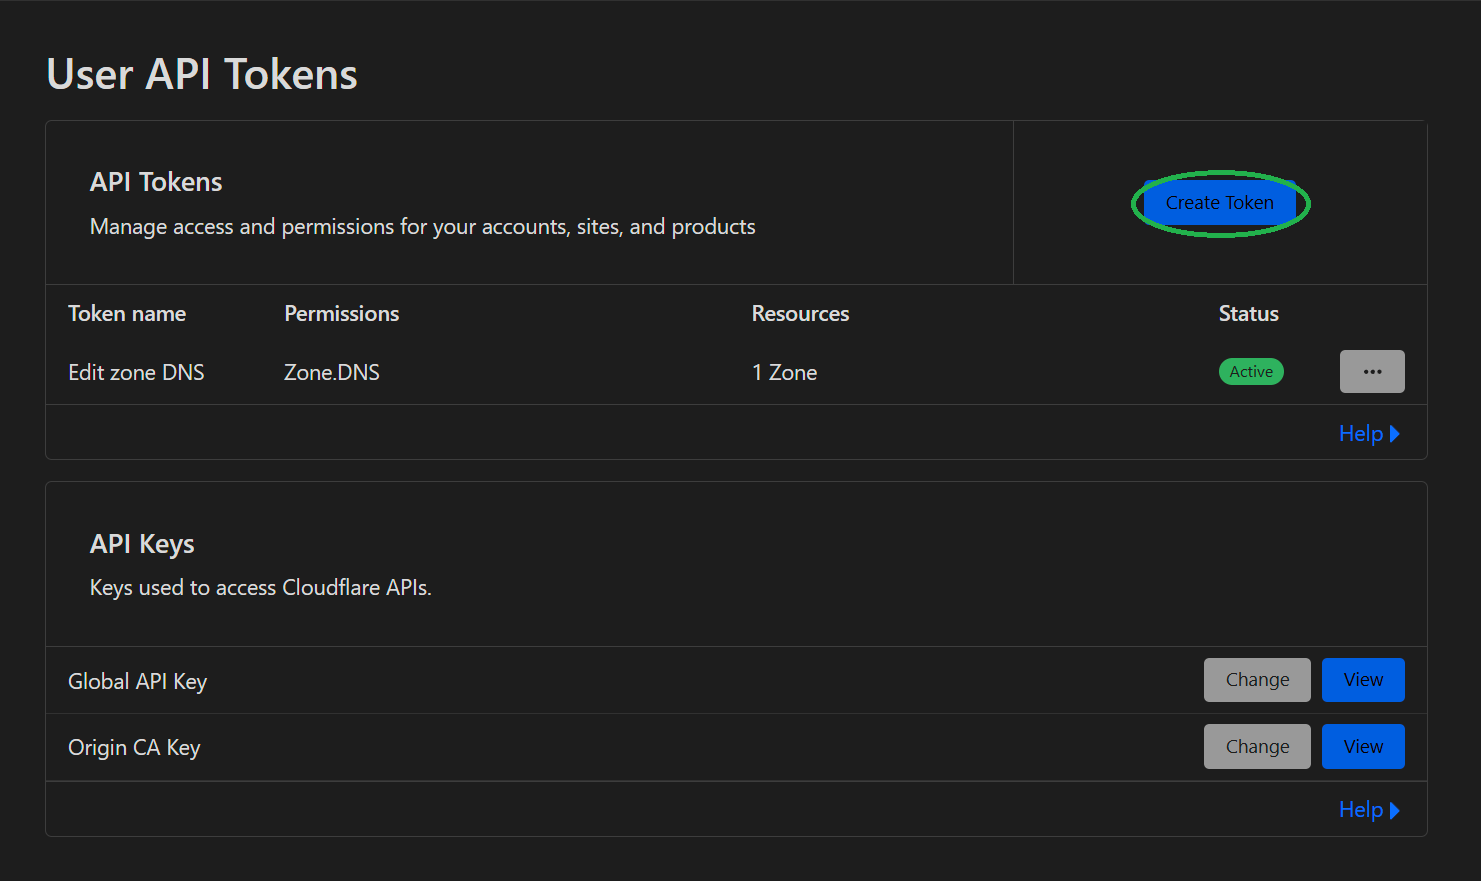
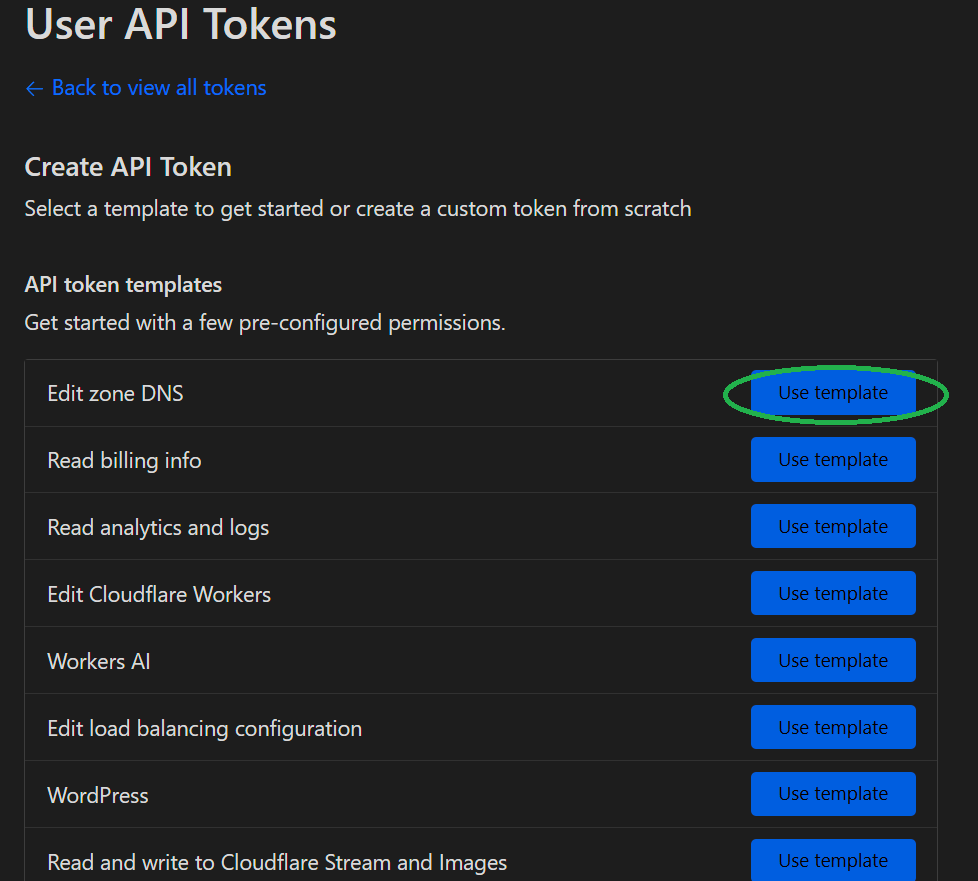
On the following page, click Create Token then Use Template on the Edit zone DNS row.
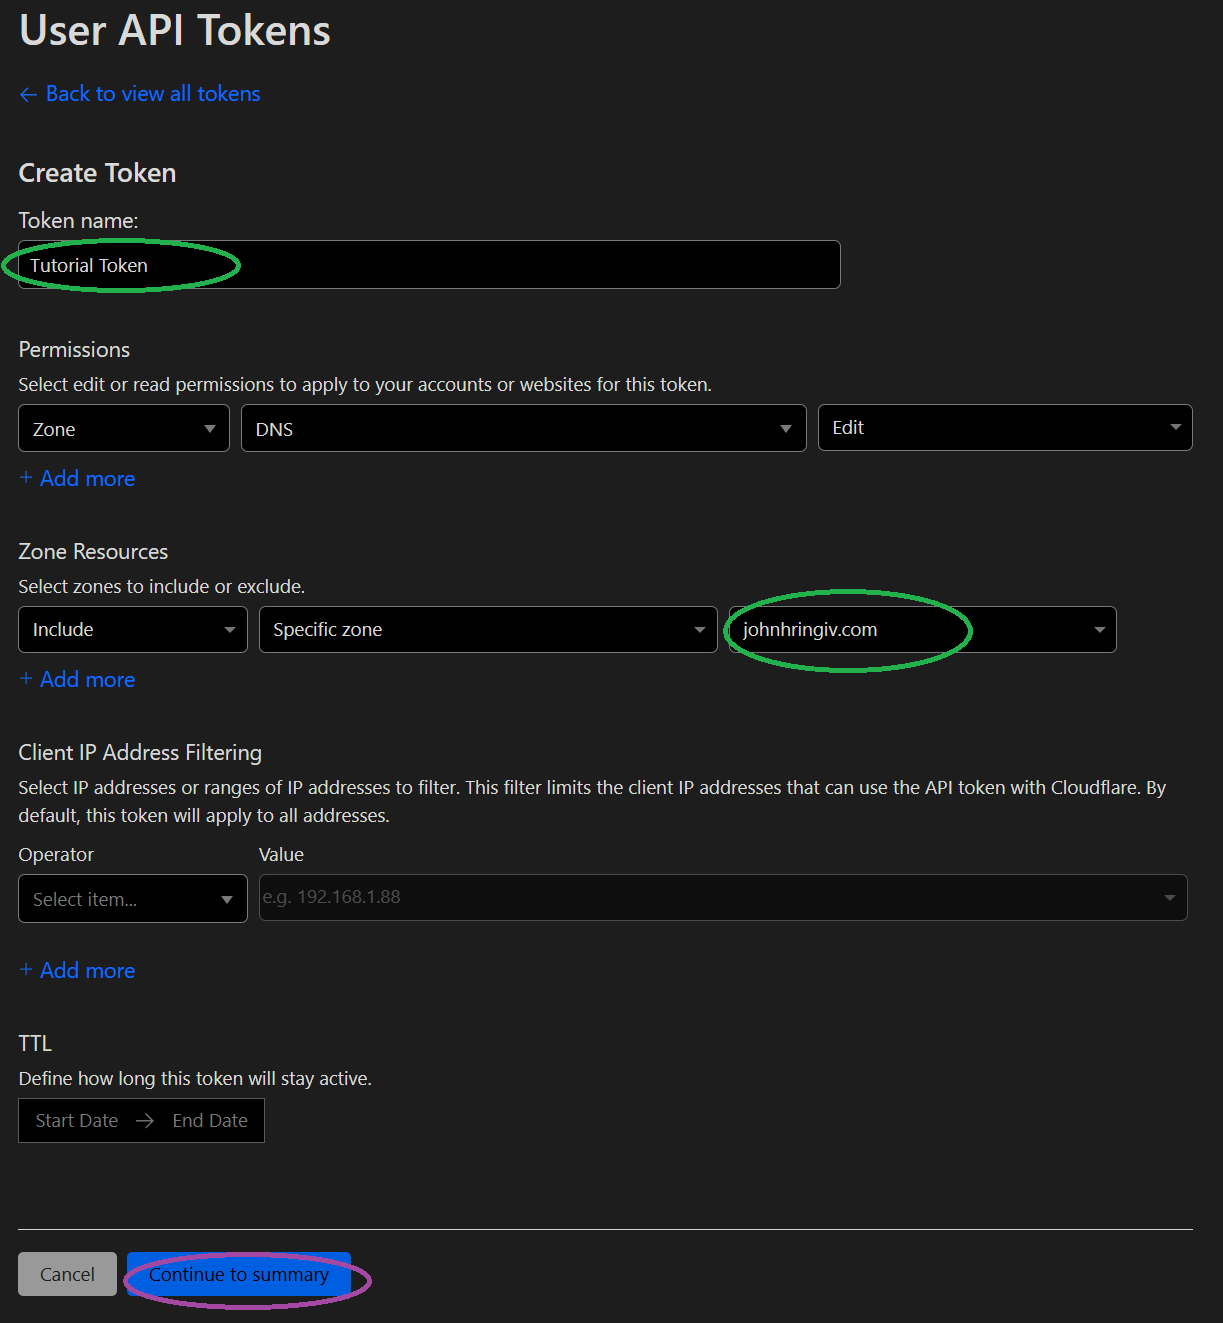
Pick a name, select the zone you want to manage, then click Continue to summary and Create Token. Be sure to copy the token from the following page as it will not be shown again.

Creating a Certificate (ACME)
With our token created, we can now generate a certificate with ACME.
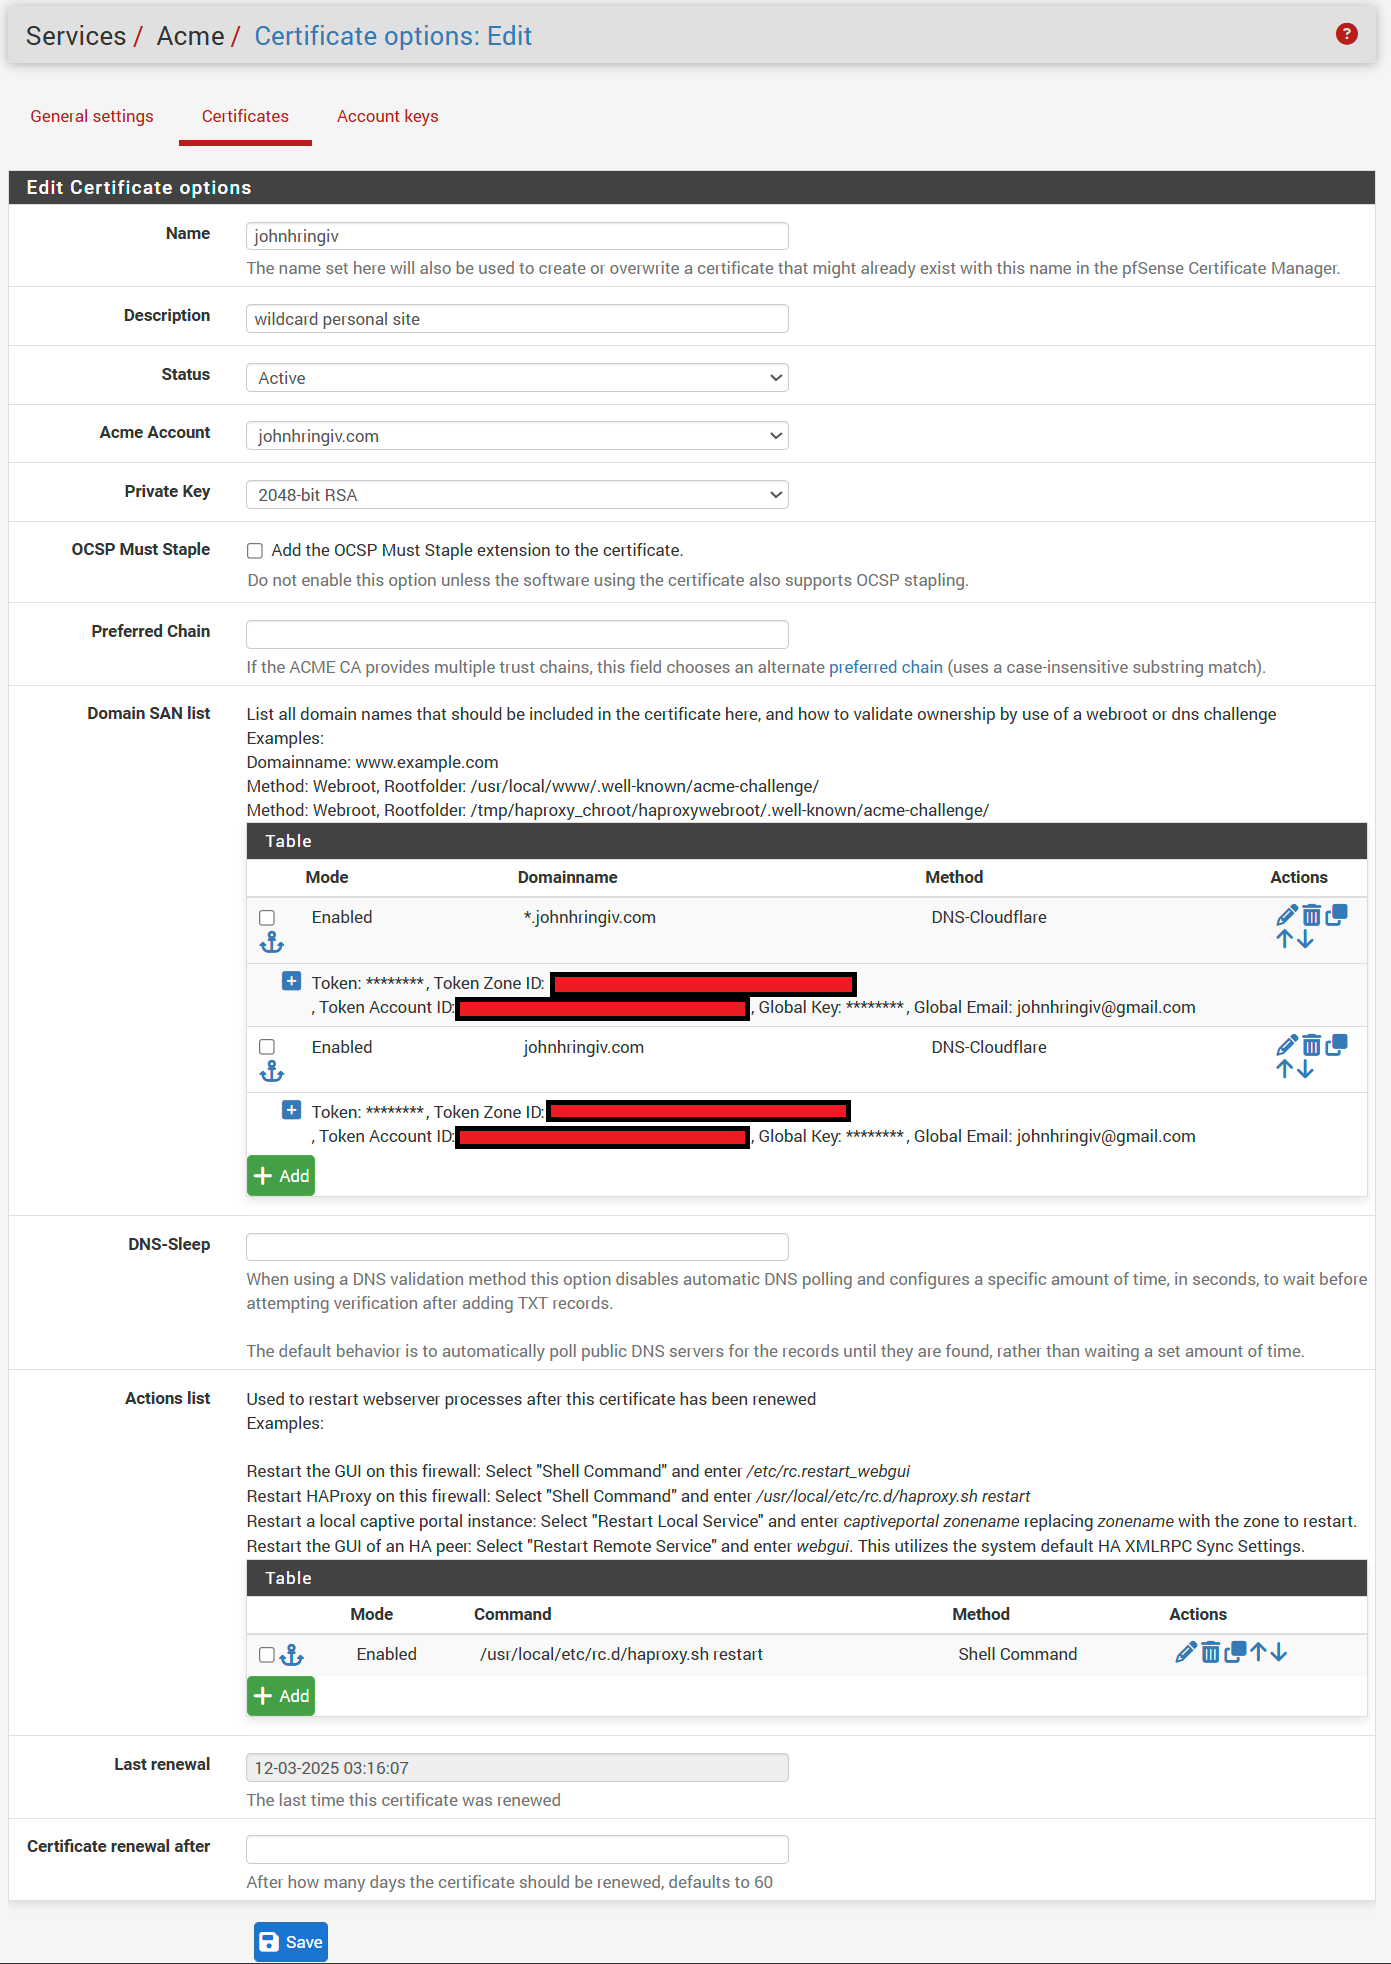
In pfSense, navigate to Services/ ACME/ Certificates and click Add.
Enter a name, description, and select your Acme account.
On the same page in the Domain SAN list add your domain name, ex. johnhringiv.com and select DNS-Cloudflare as the Method.
In the popup, enter the information you gathered from Cloudflare.
The form doesn't make this clear, but you do not need to enter a global key or email when using the token method.
Click add again and enter the same Cloudflare information for the wildcard domain, ex. *.johnhringiv.com.
If you skip this step your certificated will not be valid for subdomains.
- Token → Tutorial Token
- Token Zone ID → Zone ID
- Token Account ID → Account ID
Finally in Actions list add /usr/local/etc/rc.d/haproxy.sh restart to automatically restart HAProxy when the certificate is renewed and click save.
After completing these steps your end result should look similar to mine.
With all the configuration complete click Issue/Renew to create the certificate. If this step fails make sure you don't have any firewall rules blocking ACME (Ex. pfBlockerNG). I don't recall what the defaults are under general settings, but I have both Cron Entry and Write Certificates checked.
Re-enable Cloudflare Proxy
At this stage, you should re-enable Proxy status (Orange Cloud) for your DNS records in Cloudflare.
Other important Cloudflare settings are in DNS/Settings Enable DNSSEC and under SSL/TLS clicking configure and selecting Full(Strict).
The Full (strict) mode ensures that the connection between Cloudflare and your server is encrypted using a valid certificate; like the one we just created.
Dynamic DNS (DDNS)
Most residential customers don't have a static IP.
If your IP changes, you'll need to update your DNS records in Cloudflare.
Fortunately, Cloudflare and pfSense support dynamic DNS updates.
We'll use our token from the previous step.
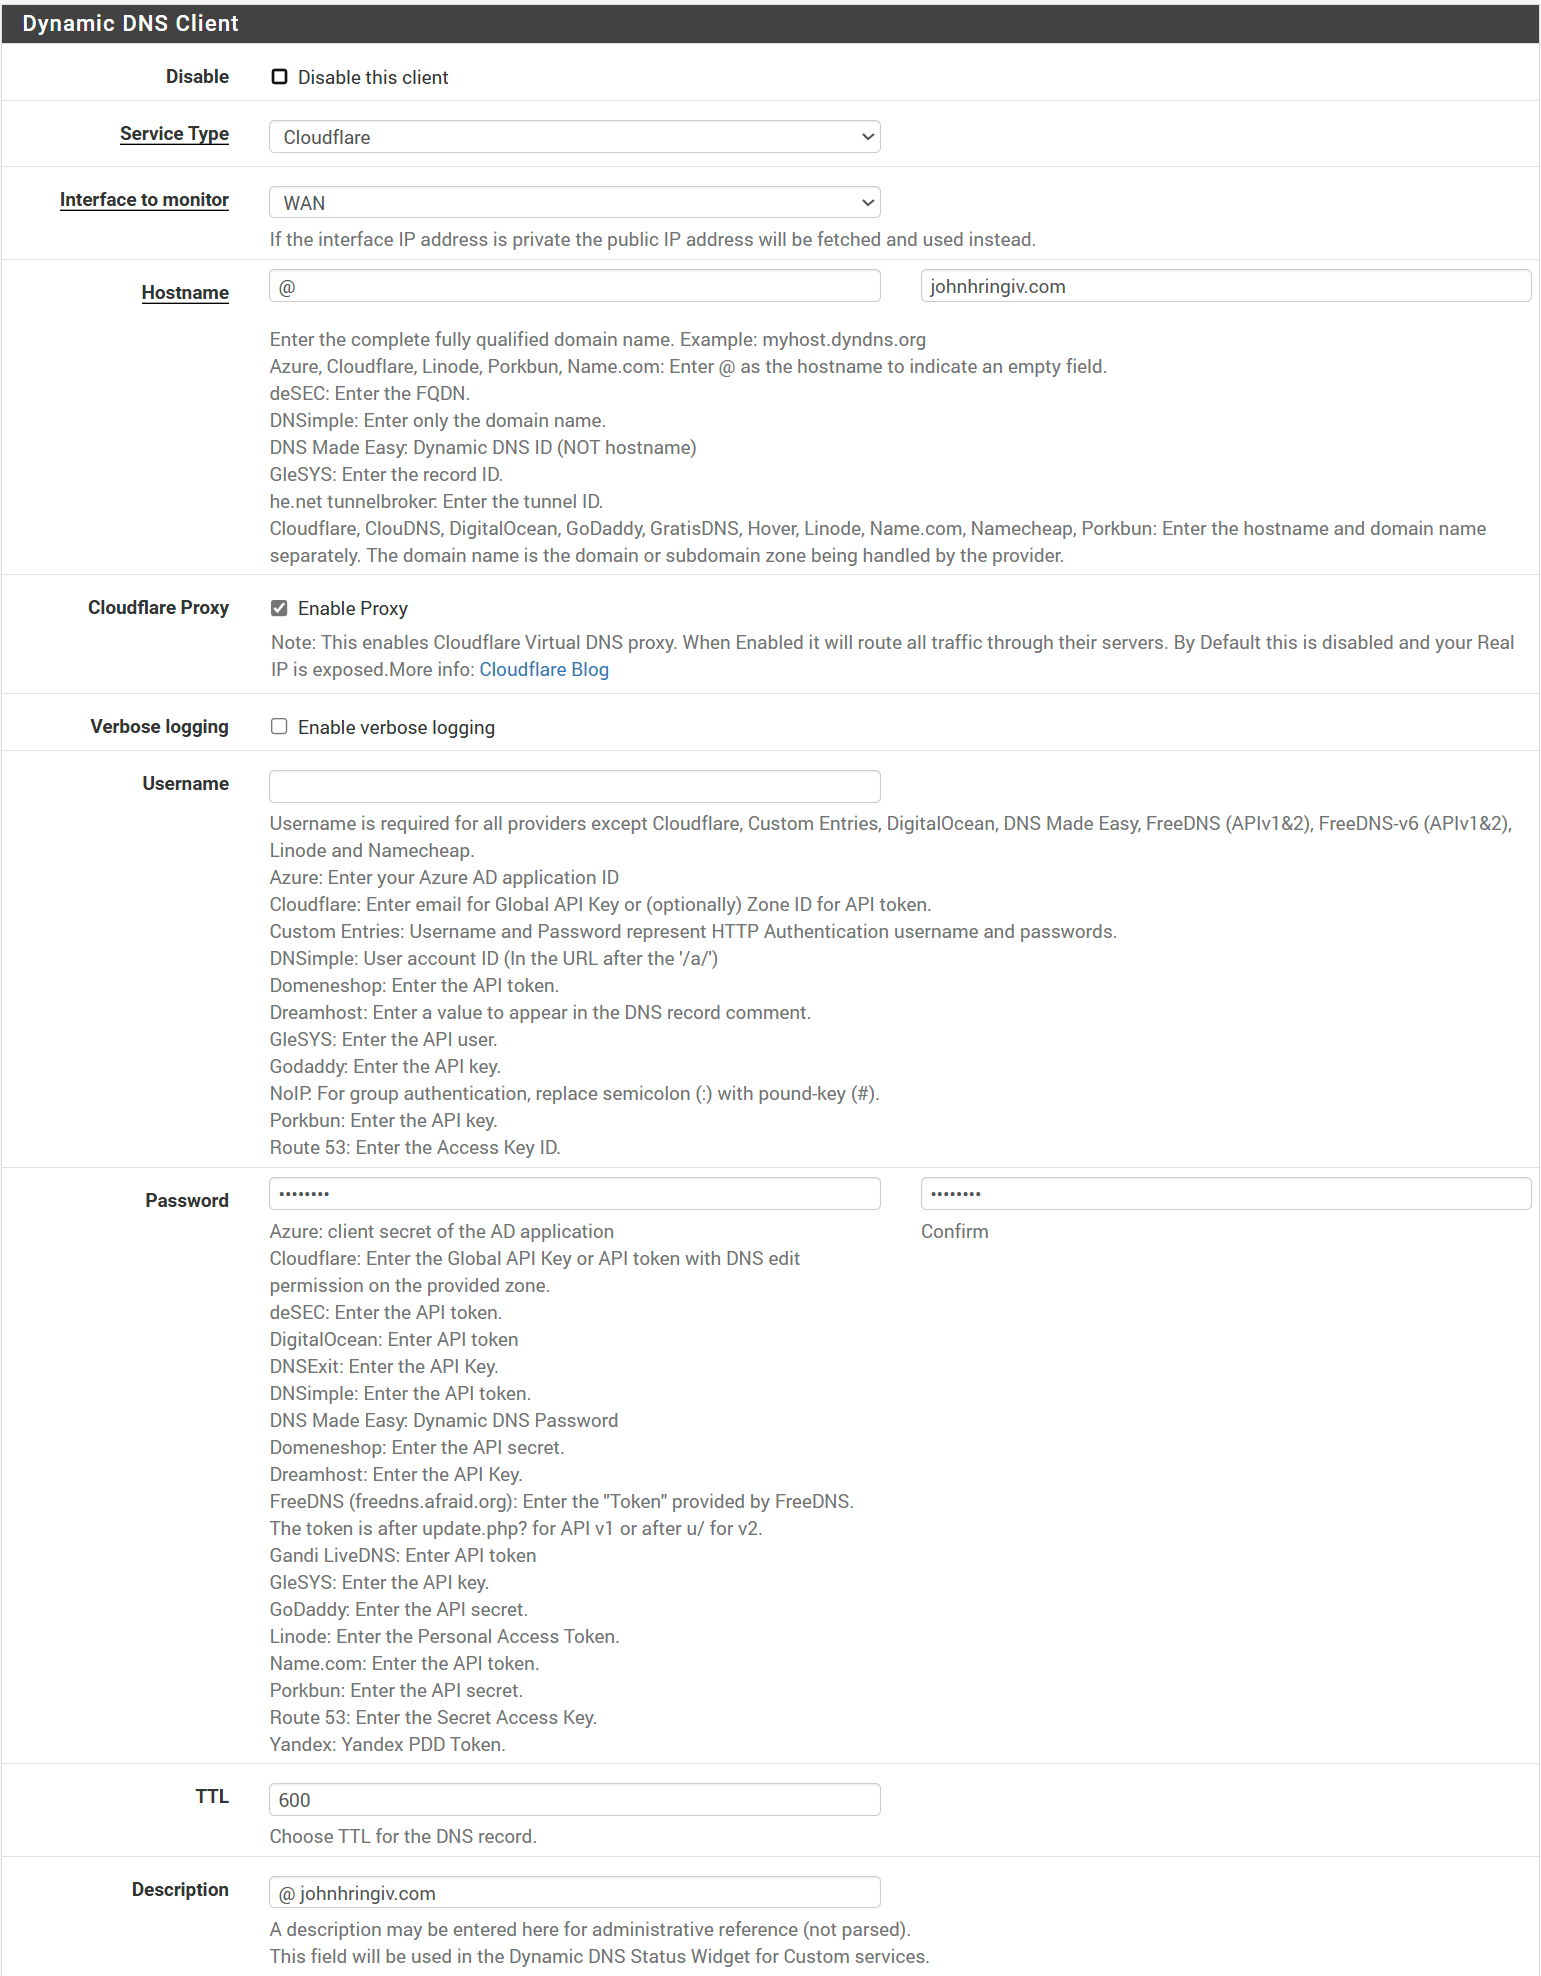
In pfSense go to Services/Dynamic DNS and click Add.
Set the following:
- Service Type → Cloudflare
- Interface to monitor → WAN
- Hostname → @, johnhringiv.com
- Cloudflare Proxy → ✓
- Password → Token
- TTL → 600
- Description → @ johnhringiv.com
and save. Repeat those steps for * and www
pfSense Firewall Rules
Like most firewalls, pfSense blocks all incoming traffic by default. We need to create a firewall rule to allow traffic on ports 80 and 443 on the WAN. Note that this is not a port forward as we are not forwarding traffic to a specific server.
Since we're proxying though Cloudflare, we can restrict this rule to only allow traffic from Cloudflare's IP addresses.
In the pfSense interface head to Firewall/Aliases/IP, click Import, set Alias Name to cloudflair_ipv4, paste the IP ranges from the link above into the IP Address field then click save.
Now go to Firewall/Rules/WAN, click Add and set the following:
- Action → Pass
- Interface → WAN
- Address Family → IPv4
- Protocol → TCP
- Source → Address or Alias, cloudflare_ipv4
- Destination → WAN address
- Destination Port Range → HTTPS (443)

click Save. Then repeat the process for Destination Port Range HTTP (80) and click Apply Changes. The end result should look something like this.

NAT Reflection
Those rules cover traffic coming into our network, but what about reaching our site from the lan?
As it stands, it won't work, but fortunately there's an easy solution, NAT reflection.
Navigate to System/ Advanced/ Firewall & NAT.
In the Network Address Translation section set:
- NAT Reflection mode for port forwards → Pure NAT
- Enable NAT Reflection for 1:1 NAT → ✓
and click save.

Configuring HAProxy
We now have everything in place to put our site/app on the internet. In this part of the guide, I'll be showing you how to use HAProxy to route requests to your backend server(s). As a prerequisite, you should have a backend server running a web service (ex. nginx, apache, etc.) that is accessible on your local network. My backends are using Nginx, and there will be some optional Nginx specific examples. A major benefit of using HAProxy is simplifying backend server configurations and allowing you to focus on the application itself rather than the networking. I'll be covering a few configurations, don't hesitate to deviate from the guide to meet your needs.
In the pfSense web interface navigate to Services/HAProxy/Settings and set the following:
- Enable HAProxy → ✓
- Maximum connections → 500
- Reload Behavior → Check Force immediate stop of old process on reload. (closes existing connections)
- Remote syslog host → /var/run/log
- Internal stats port → 2200
- SSL/TLS Compatibility Mode → Modern
- Max SSL Diffie-Hellman size → 2048
- Custom options → tune.comp.maxlevel 6
These are a bit opinionated, but I find them to be a good starting point.
Having the stats and logging enabled is useful for debugging and monitoring.
I'll expand on the custom options late in the guide, but for now, just know that tune.comp.maxlevel 6 is a performance tweak for compression.
Pro-Tip: There's a show button at the bottom of this page which displays the complete generated config.
This is useful for debugging as most documentation isn't showing screenshots of pfSense.
Reasoning About Frontends and Backends
The following sections should make things clear by example, but it can be helpful to quickly think big picture before we jump in. First, we need to know how many distinct services (websites, applications, etc.) we want to run. Each service will need its own backend entry in HAProxy. Multiple servers providing the same service for load balancing or high availability can be added to the same backend entry. I think of frontends in terms of domains with one frontend entry per domain. Distinct services on subdomains can be added to the same frontend entry. Put together, this creates a many-to-one relationship between backends and frontends. This mental model does not cover all use cases, but it will likely cover yours and creates a simple structure to build on.
Creating a Backend
Next, we need to define a backend server.
Navigate to Services/HAProxy/Backend and click Add.
Then add an entry to the Server list.
- mode → active
- name → web_server (use whatever you want here)
- Forward to → Address+Port
- Address → LAN IP of backend server
- Port → Port your app is listening on
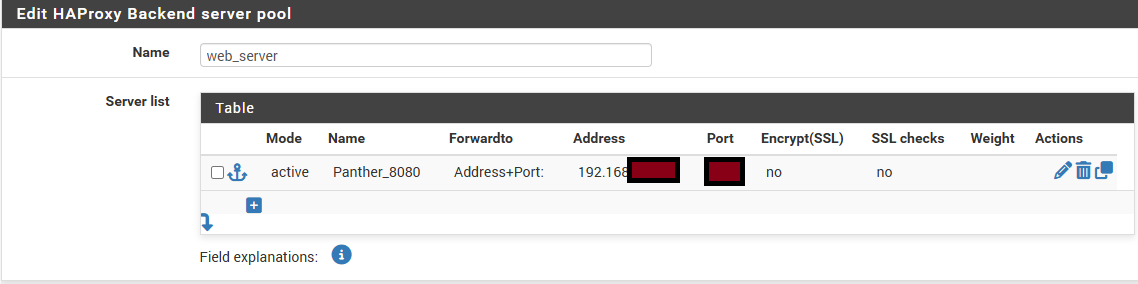
Note that we're not using SSL here as it partially defeats the purpose of SSL termination and isn't necessary on the LAN in a home environment. Feel free to use SSL if you want to just make sure to disable SSL checks if using an unsigned cert.
Health Checking (Optional)
I recommend setting Health check method to none until you have everything working as it has to be properly configured on your service. Health checking allows HAProxy to check the health of your backend server and only route traffic to healthy servers. This is useful for load balancing and failover.
- Health check method → HTTP
- Http check method → OPTIONS
- Url used by http check requests → /nginx-health
This is a custom endpoint I created on my applications using nginx.
location /nginx-health {
    access_log off;
    default_type text/plain;
    return 200 "healthy\n";
}
Again, if this isn't configured on your backend server, just set health check to none.
That's it for the backend server, give it a name and click Save.
If you have additional backends, for serving different applications, repeat the process.
I'll be creating two additional entries for my Plex server* and a second web server.
*Plex requires additional configuration to comply with Cloudflare's TOS which is not covered in this post but may be in a follow-up if there's interest.
Load Balancing
While we're here, let's take a moment to talk about some of the more advanced features of HAProxy. To use the load balancing feature all need to do is add multiple servers to the backend server list and select an algorithm (ex round robin) from Load balancing options. To avoid downtime during a redeployment, you can update your servers one at a time. Alternatively, you can designate a server as backup which will only be used if the primary server is down. For both these options, you will need to previously mentioned health checks for this to work.
Creating the Frontend
We're nearing the end! Let's create a frontend to listen for incoming requests and route them to the appropriate backend server. I recommend creating a frontend for each domain you want to route. We'll start with a single frontend for our main domain then show how to easily add a second.
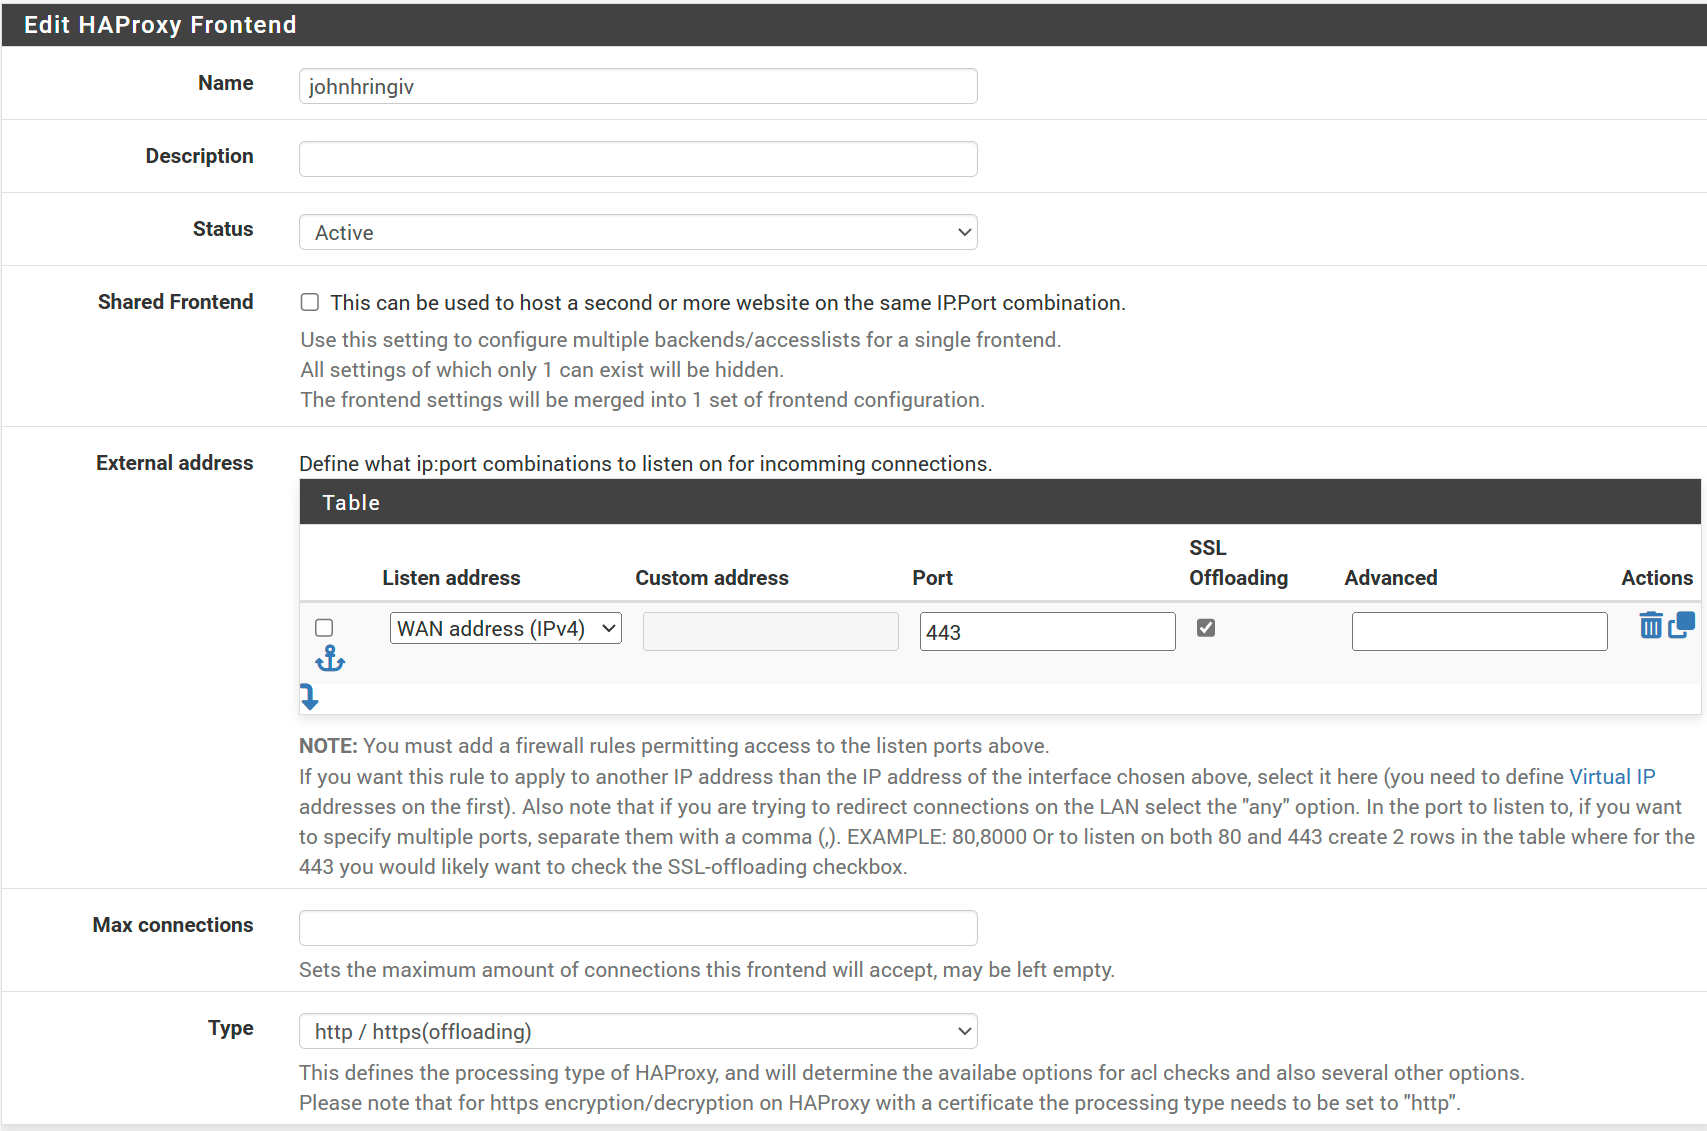
Navigate to Services/HAProxy/Frontend and click Add.
We need to add an entry to External Address to listen to incoming connections.
- Name → johnhringiv
- Status → Active
- External Address:
- Listen Address → WAN address (IPv4)
- Port → 443
- SSL Offloading → ✓
- Type → http/https (offloading)
Next we'll be completing the Default backend, access control lists and actions. We'll use the Access Control Lists (ACLs) to route traffic based on the domain in the HTTP header. For my use case I'll add the following ACL entries:
- Name → johnhringiv
- Expression → Host Matches
- Value → johnhringiv.com
- Name → plex
- Expression → Host Matches
- Value → plex.johnhringiv.com
Then add corresponding actions:
- Action → Use Backend
- backend → web_server
- Condition acl names → johnhringiv
- Action → Use Backend
- Backend → plex
- Condition acl names → plex
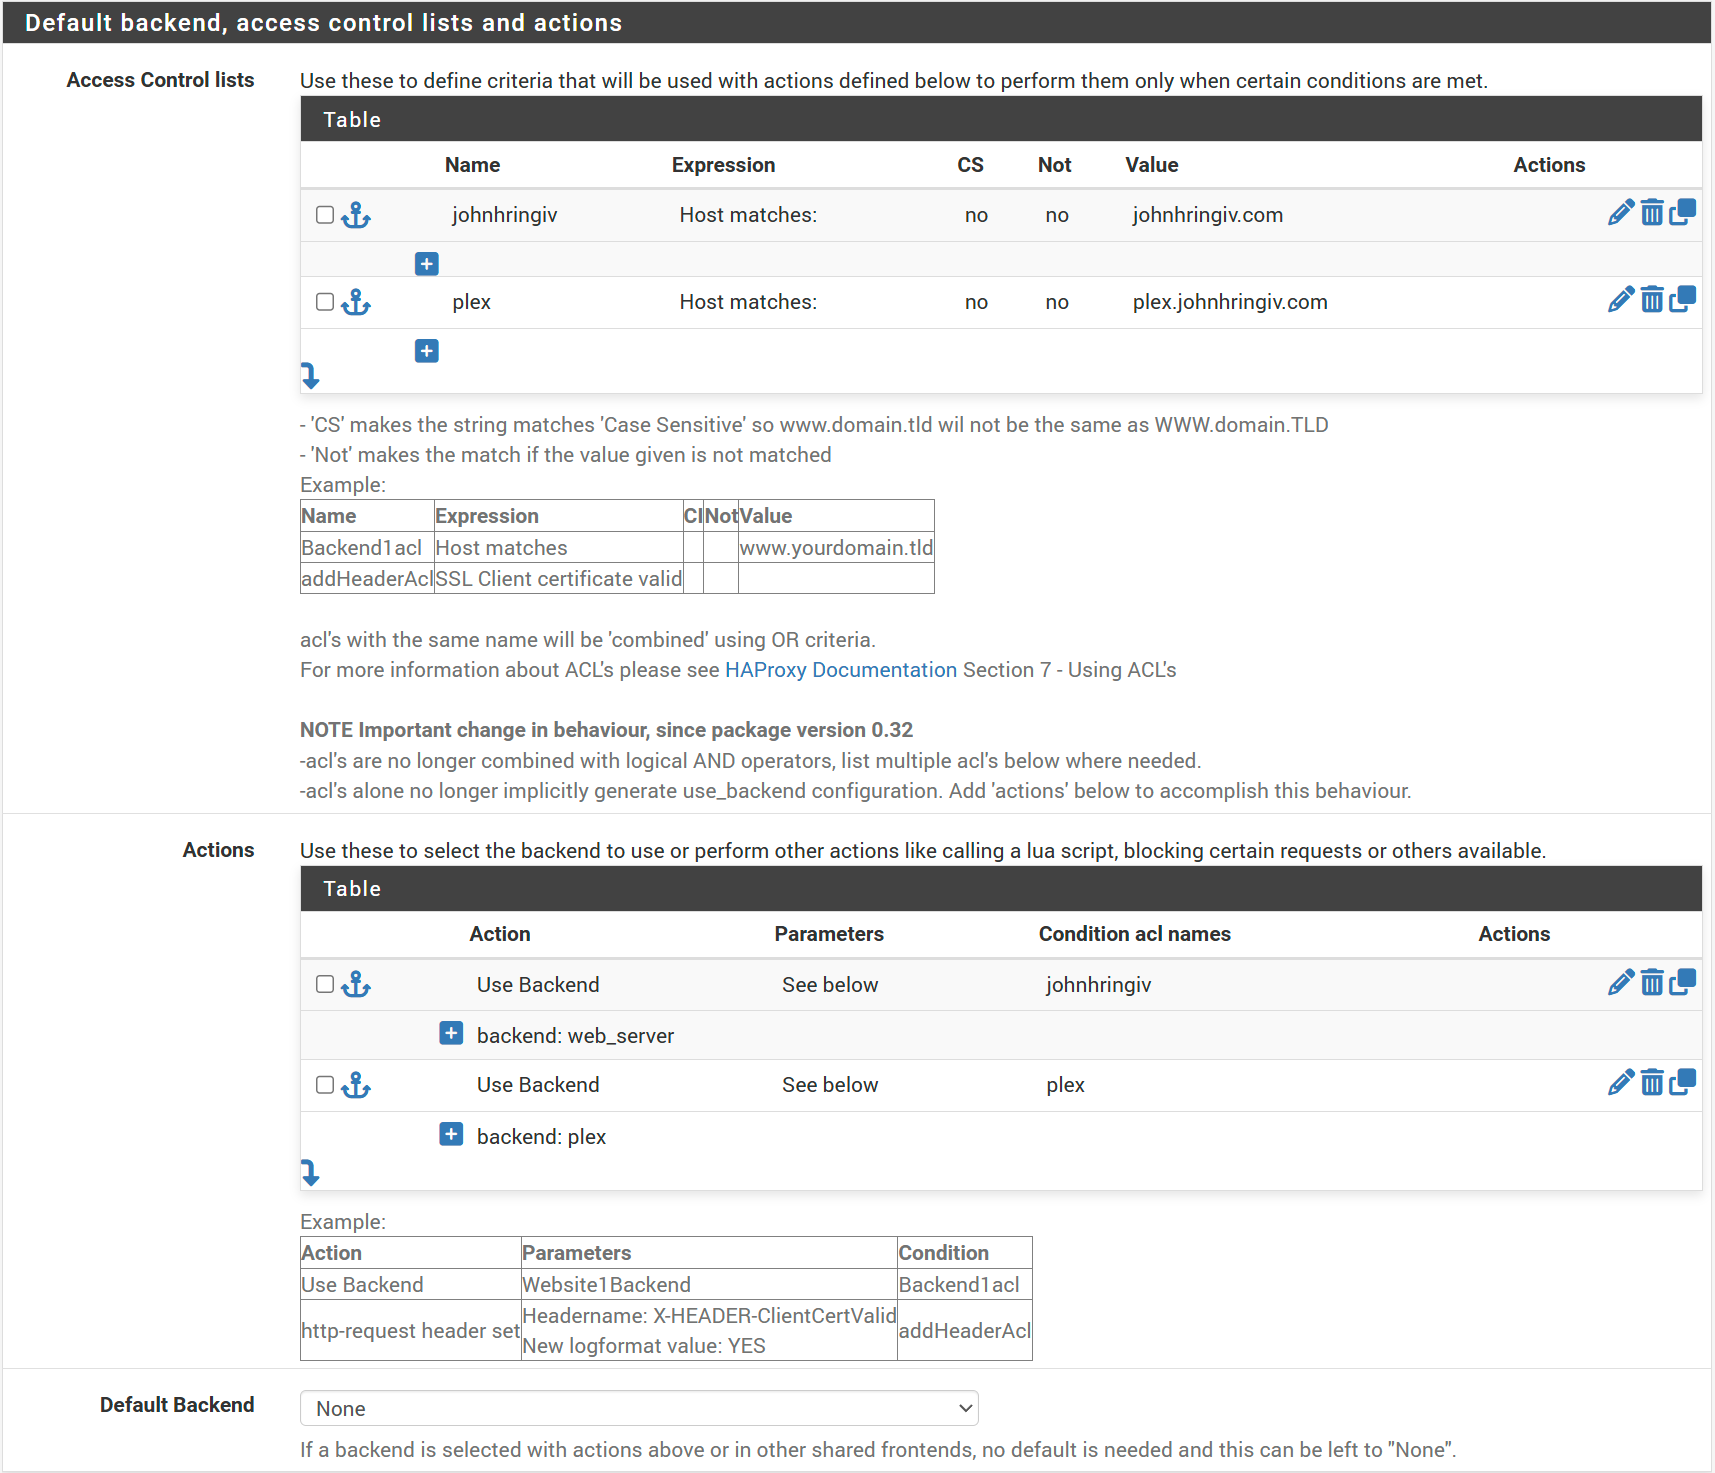
The last mandatory setting for this frontend is selecting the matching certificate (in my case johnhringiv) in the SSL Offloading section.

Optional Configuration
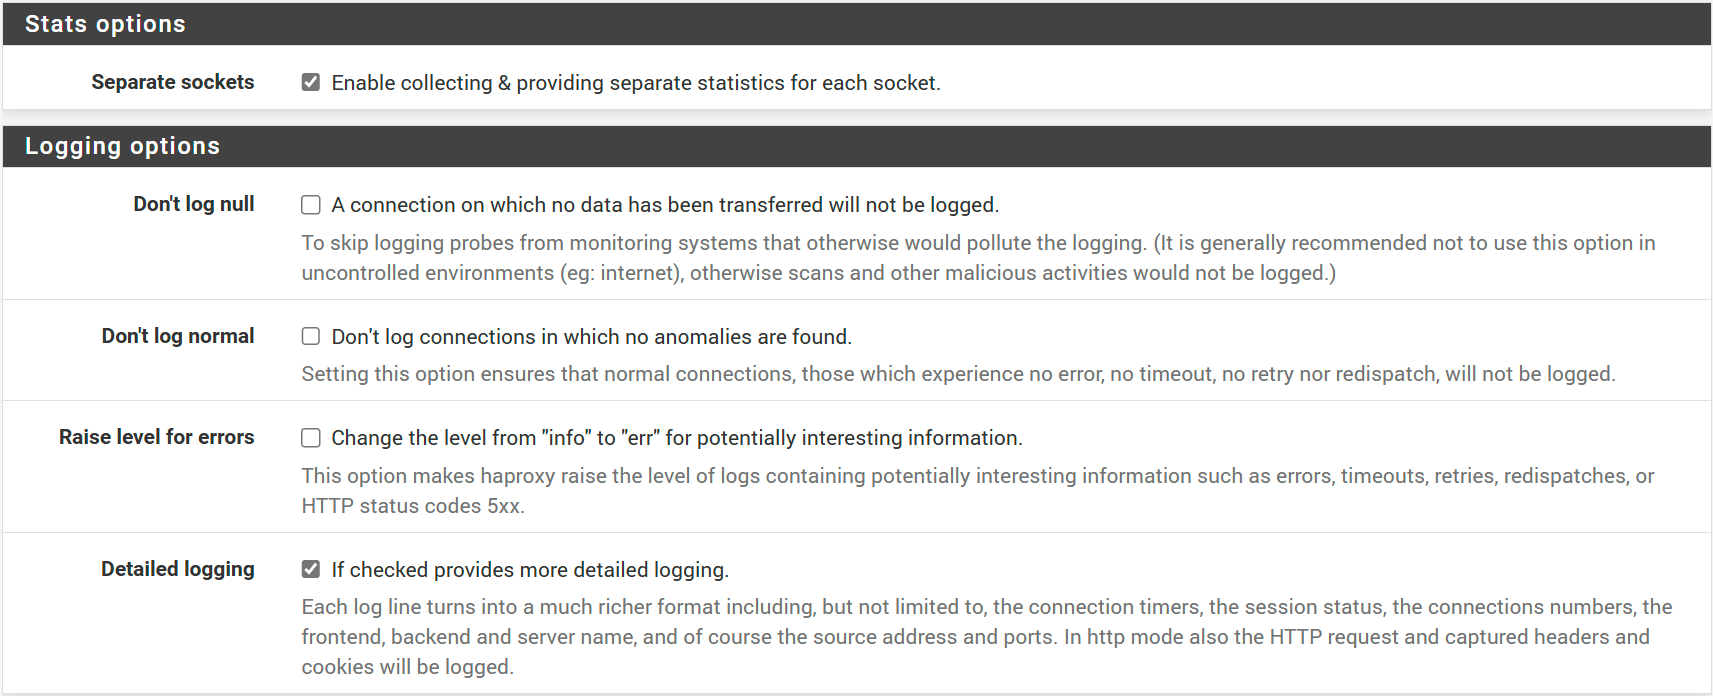
I've enabled some additional settings helpful for debugging and monitoring.
- Stats options/ Separate sockets → ✓
- Logging options/ Detailed logging → ✓
- Advanced settings/ Use "forwardfor" option → ✓
Finally, in Advanced settings/Advanced pass thru I have:
filter compression
compression algo gzip
compression type text/richtext text/plain text/css text/x-script text/x-component text/x-java-source text/x-markdown application/javascript application/x-javascript text/javascript text/js image/x-icon image/vnd.microsoft.icon application/x-perl application/x-httpd-cgi text/xml application/xml application/rss+xml application/vnd.api+json application/x-protobuf application/json multipart/bag multipart/mixed application/xhtml+xml font/ttf font/otf font/x-woff image/svg+xml application/vnd.ms-fontobject application/ttf application/x-ttf application/otf application/x-otf application/truetype application/opentype application/x-opentype application/font-woff application/eot application/font application/font-sfnt application/wasm application/javascript-binast application/manifest+json application/ld+json application/graphql+json application/geo+json
compression direction both
compression offloadThis offloads compression from our backend server(s) to HAProxy. I do this for a few reasons:
- Intel QAT (hardware acceleration) present on my pfSense box accelerates gzip in addition to cryptography
- We move a CPU intensive task from our backend servers
- Backend configuration is simplified.
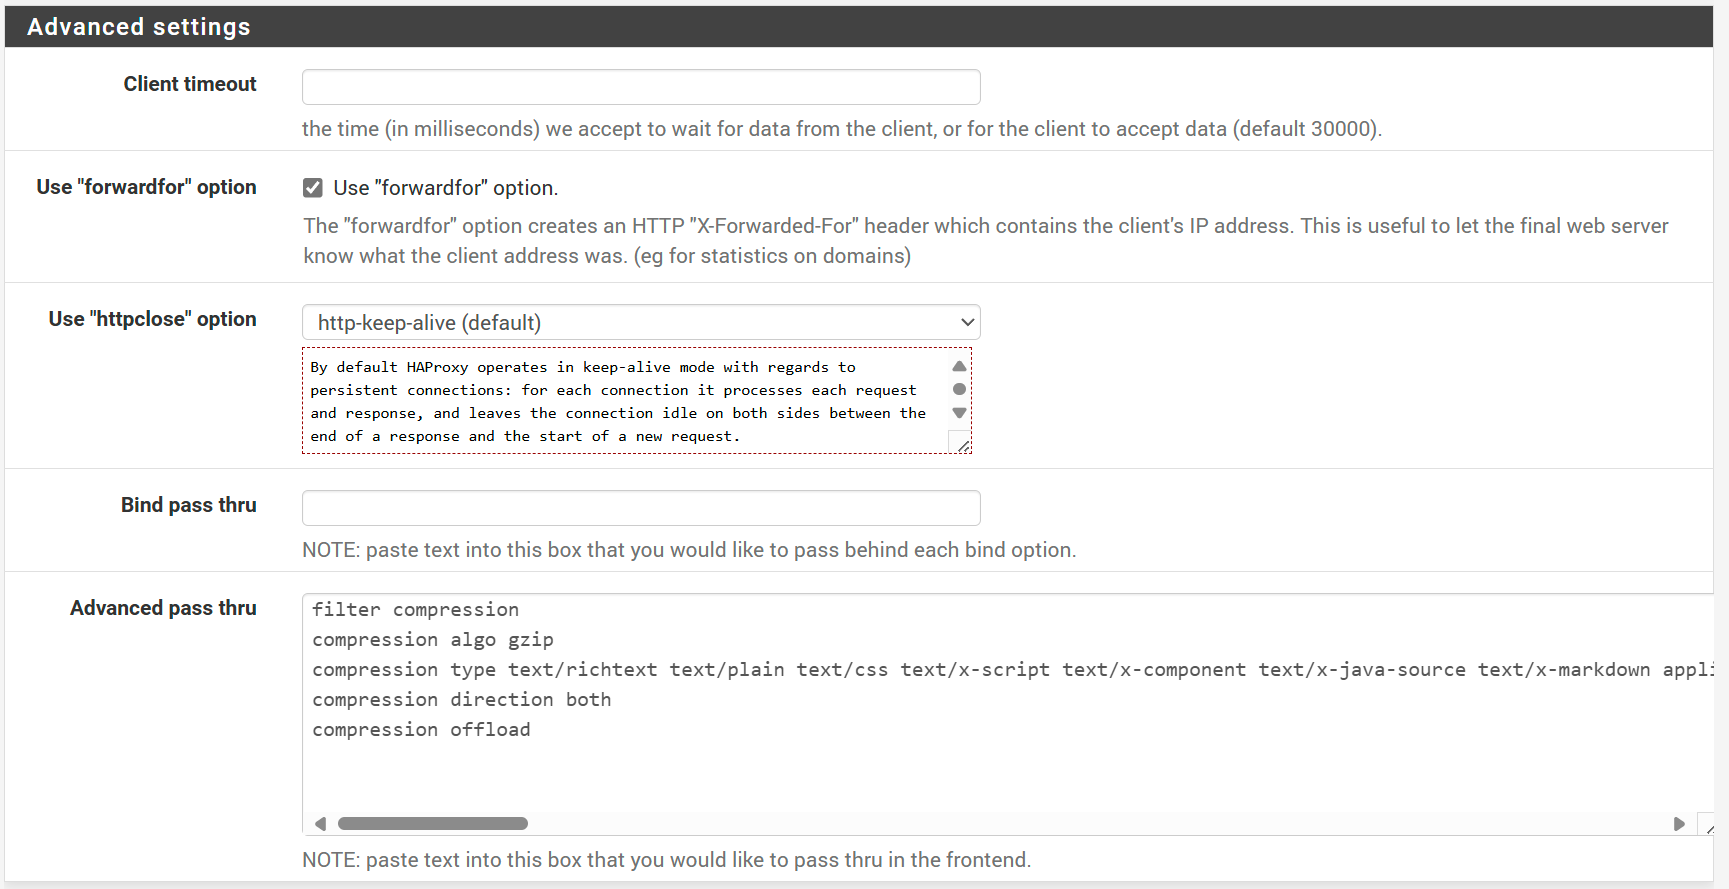
The long list of mime types is copied from Cloudflare's recommendations. Note that this is not a requirement, and you can skip this step if you prefer to handle compression on your backend server. Finally, click Save and Apply Changes.
Congratulations! You should now be able to access your website! Before we pop the champagne, there's still a couple of minor things to take care of.
HTTP Redirects
Currently, we don't have anything listening to HTTP traffic (port 80). We're also ignoring the www subdomain which some users may enter out of habit. We'll add a frontend entry for each to use and redirect traffic.
Redirect HTTP to HTTPS
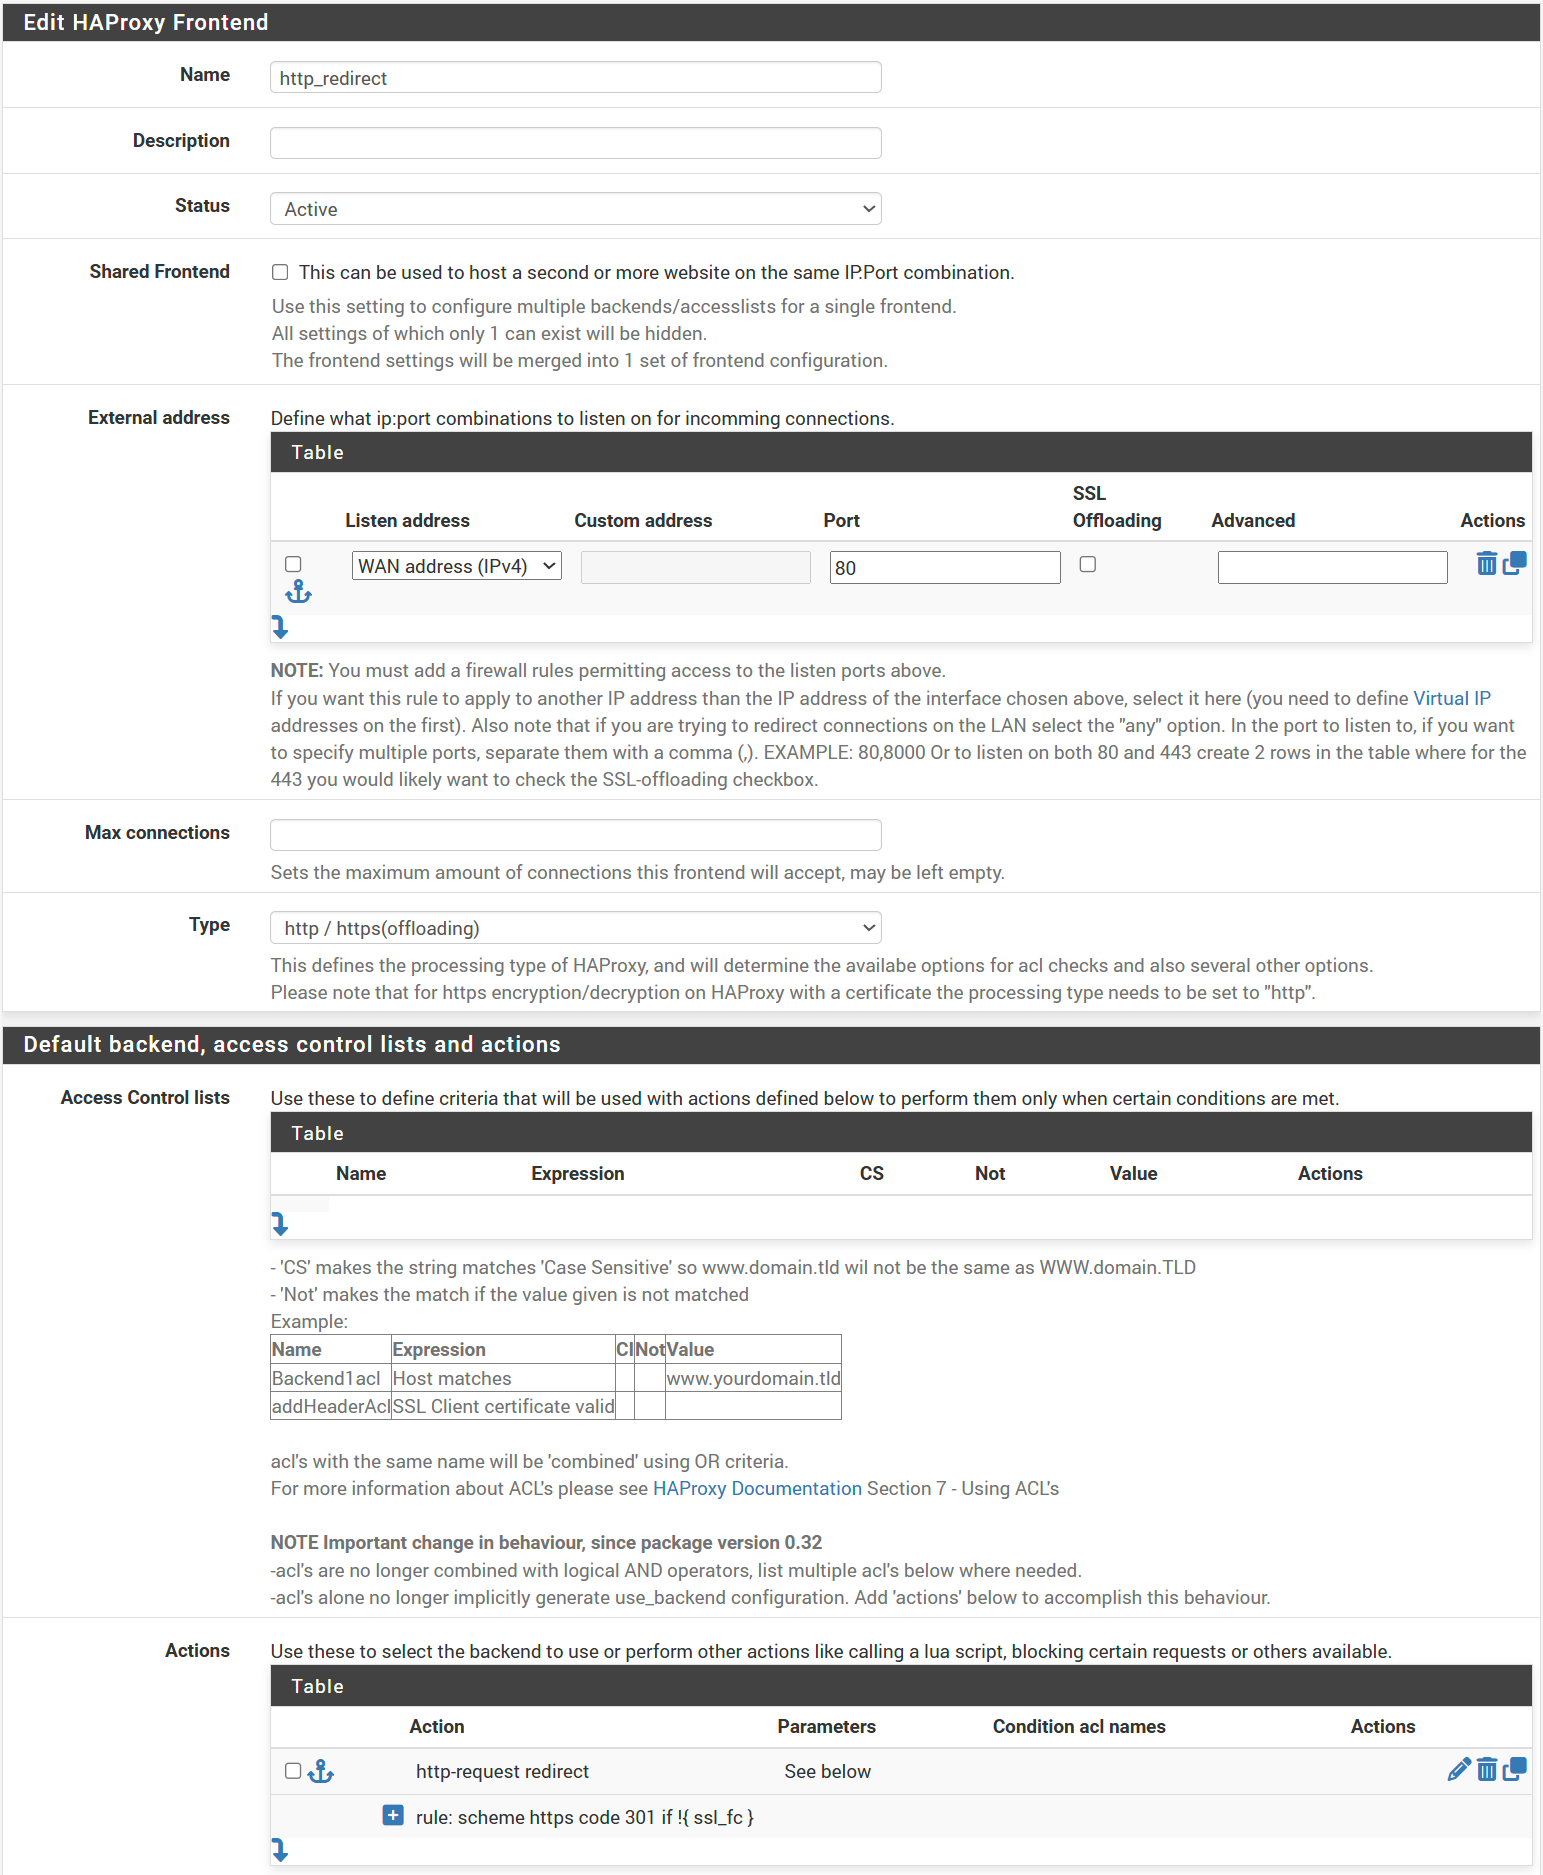
Our goal is to listen for HTTP traffic on port 80 and redirect it to HTTPS.
- Name → http_redirect
- Status → Active
- External Address:
- Listen address → WAN address (IPv4)
- Port → 80
- SSL Offloading → Unchecked
- Type → http/https (offloading)
- Actions:
- Action → http-request redirect
- Rule → scheme https code 301 if !{ ssl_fc }
Click Save and Apply Changes. This rule redirects all HTTP traffic, if you want to be more specific, you can add an ACL.
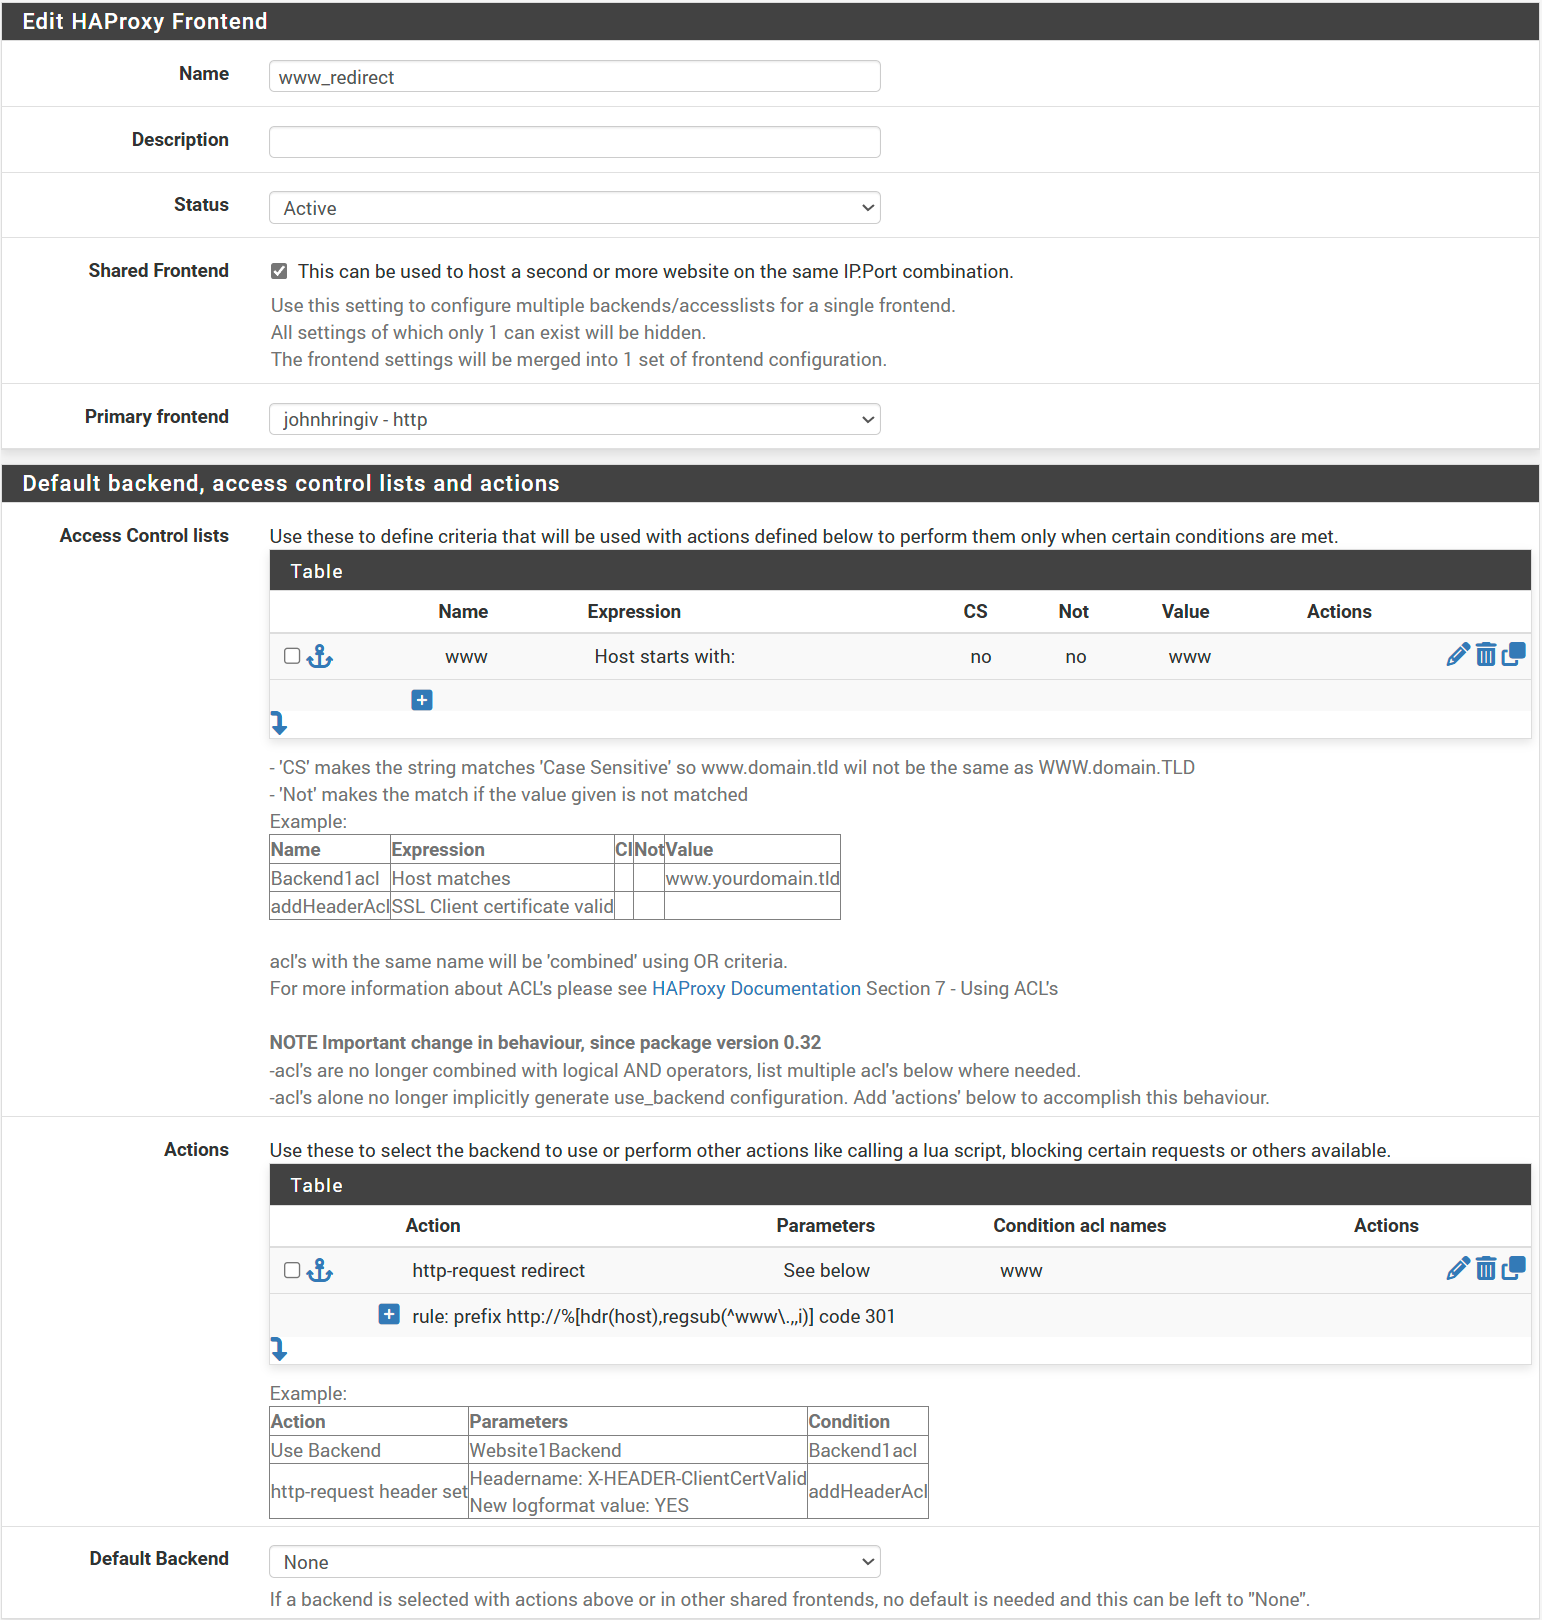
Redirect www to Root
I want to redirect www.johnhringiv.com to johnhringiv.com. It's best practice to redirect all traffic to a single domain, and I prefer the shorter one. Since we already have a frontend listening on WAN 443, we can use a Shared Frontend.
- Name → www_redirect
- Status → Active
- Shared Frontend → ✓
- Primary Frontend → johnhringiv - http
- Action Control lists:
- Name → www
- Expression → Host starts with
- Value → www
- Actions:
- Action → http-request redirect
- Rule → prefix http://%[hdr(host),regsub(^www\.,,i)] code 301
- Condition acl names → www
This will match all domains starting with www you can be more restrictive if your use case requires.
Once again do not select any offloading for the redirect. Click Save and Apply Changes.
Our redirect rules will work in combination. For example, if a user enters http://www.johnhringiv.com they will be redirected to https://www.johnhringiv.com then to https://johnhringiv.com which is sent to a backend.
Additional Domains
Thanks to the work we've done thus far, adding additional domains is trivial. I purchased a second domain for this example (woodworkingdatascientist.com), configured DNS, created a cert, and added a backend as described above. The pattern is the same as the first domain except we use the Shared Frontend option and need to select an additional cert.
- Name → woodworkingdatascientist
- Status → Active
- Shared Frontend → ✓
- Primary Frontend → johnhringiv - http
- Action Control lists:
- Name → domain
- Expression → Host matches
- Value → woodworkingdatascientist.com
- Actions:
- Action → Use Backend
- backend → woodworkingdatascientist
- Condition acl names → domain
- Condition acl names → www
- Use Offloading - Specify additional certificates for this shared-frontend → ✓
- SSL Certificate → woodworkingdatascientist
Click Save and Apply Changes.
IPV6, HSTS, & HTTP/2
Since we're proxying through Cloudflare I didn't see any benefit to adding IPV6 as it would only apply to Cloudflare's connection to our origin.
Users have full IPV6 connectivity to Cloudflare.
If needed, adding IPV6 should be straightforward given the IPV4 example.
HSTS is an important security feature that forces clients to use HTTPS.
This can be enabled in Cloudflare and I recommend it.
Since we're using Full (strict) mode, we don't need to worry about it on our end as Cloudflare will only connect to our server using HTTPS.
HAProxy and Cloudflare both support HTTP/2 out of the box so no additional configuration is needed.
The connection between Cloudflare and our origin will use HTTP/2, Cloudflare additionally supports HTTP/3 for connections between the client and Cloudflare.
The connection between HAProxy and our backend will use HTTP/1.1 as we're performing SSL termination on HAProxy (HTTP/2 wouldn't give us any benefit here anyway).
Conclusion
With this setup, you've built a modern and secure self-hosted infrastructure.
By using Cloudflare for DNS and proxying, you gain performance and protection at the edge.
With ACME and HAProxy, you're automatically managing TLS certificates and intelligently routing traffic to your internal services—all without relying on third-party hosting or manual certificate renewal.
This architecture gives you flexibility, scalability, and full control over your traffic.
Whether you're hosting personal projects or production workloads, it's a rock-solid foundation for any self-hosted setup.
Say Hello! If you found this helpful, spotted something that could be improved, or just want to say thanks—I'd love to hear from you. Shoot me an email at [email protected]. Being a self-hosted blog I don't have any good metrics of readership, so hearing from real people is the best way to know this content is reaching someone. If enough people are interested, I'll get a comment system going.